Différences entre versions de « Comment formater son article »
m |
m |
||
| Ligne 1 : | Ligne 1 : | ||
| − | |||
==Introduction== | ==Introduction== | ||
Version du 12 juin 2015 à 12:27
Introduction
Cet article explique comment formater votre tutoriel. En suivant ce guide et celui sur le style de rédaction, votre tutoriel appliquera les recommandations d'ikoula.
Syntaxe wiki
Les tutoriaux ikoula doivent être formaté en utilisant la syntaxe wiki. Cet article va vous donner les exemples les plus courants de cette syntaxe. Vous trouverez plus de détails dans la section d'aide de mediawiki quant au formatage wiki.
Headers
This section explains how to use headers in your tutorial.
Title
The tutorial should begin with a title using an H1 header.
For procedural tutorials, the title should begin with How To.
The typical title should follow the format of How To do <Task> with <Software> on <Distro>.
Markdown Example:
- How To Set Up a Firewall Using IPTables on Ubuntu 14.04
Result:
How To Set Up a Firewall Using IPTables on Ubuntu 14.04
Introduction
The first section of every tutorial should have the H3 header Introduction, followed by a paragraph or more describing the goals, methods, and results of the tutorial.
Markdown Example:
- Introduction
OpenSSL is a versatile command line tool that can be used for a large variety of tasks related to Public Key Infrastructure (PKI) and HTTPS (HTTP over TLS).
Result:
Introduction
OpenSSL is a versatile command line tool that can be used for a large variety of tasks related to Public Key Infrastructure (PKI) and HTTPS (HTTP over TLS).
Typically, the introduction should cover:
Main topic of the tutorial Practical reasons the reader would want to follow this tutorial; e.g., Why should I install this software? Why would I want to monitor my server this way? Methods used, including all software involved Final result; i.e., What will the reader have accomplished at the end of the tutorial? Goals (Optional)
You can include an optional Goals section if your tutorial has a complicated purpose, method, or result.
Prerequisites
Introduce your prerequisites with a sentence or several paragraphs, as needed. Then, include all of the required items, software, and configurations as separate list items that the reader can use as a checklist.
Common prerequisite bullet points include:
Distribution and size (if there are minimum requirements) of the Droplet; e.g., Debian 7 Number of Droplets needed and roles, for multi-server setups Link to a tutorial about setting up a sudo user for the appropriate distribution Link to a tutorial about installing prerequisite software, such as LAMP Link to part of a tutorial; e.g., Follow Step 1 from this tutorial to install RVM Required DNS settings Required SSL certificates Remember that your tutorial should get the reader from the deployment of a vanilla distribution image to a working setup. If your tutorial is not going to start with the first SSH connection to the server, you need to link to another DO tutorial that does.
When you link to another DO tutorial as a prerequisite, make sure that you follow all the commands from that other tutorial yourself during testing. Your bash history should match the commands from every tutorial you use as a prerequisite.
H2 Steps and Body Headers
Every header must include at least one sentence under it that describes the context or purpose of that section of the tutorial. For example, you could say, In this section we will install Nginx as our load balancer. Don't jump from one header to another, and don't start a section with a contextless instruction or command.
Every header of the same level should use the same part of speech. Default to the gerund — that means -ing words. Consistency is the most important rule.
Do not use special formatting in headers.
Headers in the main body of the tutorial should be H2. In Markdown, make an H2 header with two hash marks followed by a space (*## *), followed by the title text.
For procedural tutorials, headers should include step numbers (numerical) followed by an em dash (—), like Step 1 — Installing Nginx.
Markdown Example:
- [Example] Step 1 — Installing Nginx
In this section we will install Nginx as our load balancer. Result:
[Example] Step 1 — Installing Nginx In this section we will install Nginx as our load balancer.
Subheaders
H3 headers should be used sparingly. H4 headers should be avoided. If you need to use subheaders, make sure there are two or more headers of that level within that section of the tutorial.
Remember your introductory sentences.
Markdown Example:
- [Example] Step 1 — Installing Nginx
Text
- [Example] Step 2 — Configuring the Virtual Host File
Text
- [Example] Upstream Module
Text
- [Example] Proxy Settings
Text Result:
[Example] Step 1 — Installing Nginx Text
[Example] Step 2 — Configuring the Virtual Host File Text
[Example] Upstream Module
Text
[Example] Proxy Settings
Text
Code
Code formatting should be used for:
commands files and scripts output interactive dialogues in-line items as explained in that section Every code block needs an explanation. The sentence must describe what the code block does. Examples of good explanations:
Change to the /usr/bin directory. Now we will update the port for this Apache virtual host. This short script sets up a weekly cron job to rotate the log files. Markdown Example:
```command cd /usr/bin ``` Result:
Change to the /usr/bin directory:
cd /usr/bin You will notice variable highlighting in some of examples in this section. Variables are explained in the next section.
Commands in Code Blocks
Assume a non-root sudo user.
If you want to use an example username, you can use sammy. In your prerequisites, you should link to a tutorial for setting up a sudo user for the right distro. (Exceptions: You can use root or a nonprivileged user if needed.)
Every command needs an explanation. The sentence must describe what the command does. e.g., Change to the /usr/bin directory. Describe options and flags as necessary.
Most commands should be on their own lines in code blocks, not in-line. Any command that the reader needs to execute to complete the tutorial should be on its own line.
Do not include the command prompt in the code block for bash, MySQL, etc. Use the customized DigitalOcean markdown, demonstrated below, to add the prompts to the code blocks. You can also explain context changes in the text.
You can create a standard markdown code block by surrounding the block with three backticks (```). The DigitalOcean markdown parser allows you to add the appropriate prompt by using "```command" (normal, non-root user), "```super_user" (root user), "```custom_prefix(customized>)" (any other prompt).
Markdown Example:
As a non-root user with sudo privileges, update your package lists:
```command sudo apt-get update ```
As root, add a user named "sammy":
```super_user adduser sammy ```
In the MySQL console, run this command to put the changes into effect:
```custom_prefix(mysql>) FLUSH PRIVILEGES; ``` Result:
As a non-root user with sudo privileges, update your package lists:
sudo apt-get update As root, add a user named "sammy":
adduser sammy In the MySQL console, run this command to put the changes into effect:
FLUSH PRIVILEGES; When can I group commands?
You can group commands that are covered by the same short explanation. For example, it's okay to group commands to create and then change to a new directory.
Markdown Example:
Create and change to the `Downloads` directory:
```command mkdir ~/Downloads cd ~/Downloads ``` Result:
Create and change to the downloads directory:
mkdir ~/downloads cd ~/downloads Please make sure that the first time you issue a sudo command, a command that includes a highlighted variable, or any other command that requires input, it's on its own line. When in doubt, separate your commands to one per line.
Sometimes you'll want to make sure that a command is only executed if the first command is successful. This is especially important for destructive commands. Chain these commands with a double ampersand (&&) for safety.
Markdown Example:
Delete the unencrypted file:
```command cd ~/downloads/foo && rm bar.txt ``` Result:
Delete the unencrypted file:
cd ~/downloads/foo && rm bar.txt When should I use in-line code formatting?
In-line commands are useful for referencing:
command names package names optional or destructive commands file names and paths like ~/.ssh/authorized_keys options like -latr arguments like filename example URLs like http://example.com/myapp ports like :3000 key presses like ENTER Don't use in-line code for commands the reader needs to execute to complete the tutorial. Also, don't use it to emphasize something; use bold for that.
In-line commands can be formatted with a single backtick (`) before and after the in-line text.
In-line Code Examples:
We can use `knife ssh` to issue commands to our nodes. We can use knife ssh to issue commands to our nodes.
Append the public key to the `/home/sammy/.ssh/authorized_keys` file. Append the public key to the /home/sammy/.ssh/authorized_keys file.
Remember to replace `master_private_ip` in the config file below with your master DNS server's private IP address. Remember to replace master_private_ip in the config file below with your master DNS server's private IP address.
It's time to install the `mysql-server` package. It's time to install the mysql-server package.
Files and Scripts
Always introduce a file or script by describing its general purpose. Then explain any changes that the reader will be making in the file.
Short files and scripts should be thoroughly explained in an introductory paragraph. Longer configuration files and scripts should have detailed in-line comments (at least at the block level, and possibly at the line level).
We do not want to encourage readers to copy and paste long files without understanding. If the reader just copies and pastes a big file, they will not be able to customize, update, or troubleshoot their server in the long run.
Do not include custom scripts with your tutorial. (Some exceptions include short commands that need to be run by cron, and configuration management recipes.)
Excerpts and omissions can be indicated with ellipses (. . .). If most of a file can be left with the default settings, it's usually better to show just the section that needs to be changed.
A label can be added to the code block, to denote the filename that is being shown, by adding "[label /path/to/file]" within the code block. This is demonstrated in the example. If you are showing an entire file, you may add line numbers to the code block by starting your code block with "```line_numbers".
Markdown Example: (This is an image)
File Markdown Example
Result:
Locate the <Directory /var/www/> block in the /etc/apache2/sites-available/default file and set AllowOverride to All. This will allow your .htaccess file to function. You can leave the other settings as they are (not shown):
/etc/apache2/sites-available/default <Directory /var/www/>
. . .
AllowOverride All
. . .
</Directory> Output
Describe output code blocks so the reader realizes that this is output, not something that should be executed on the command line. Often a simple Output: will suffice.
Highlight any unique output the reader needs to use later, like an auto-generated secret key.
A secondary_label can be added to the code block, to denote "Output" is being shown. This is demonstrated in the example.
Markdown Example: (This is an image)
Output example
Result:
Note down the output string. We will be using it in the configuration file of both the master and slave servers.
Output
sHi0avMk1bME89cnJdHkYzFBbvQmQ8YZ Interactive Dialogues
If your interactive dialogue brings up a graphical user interface, like when you install MySQL, please use an image.
If your interactive dialogue is just text, you can show the prompt in a code block, and the user entry in red. You should explain that this is how you're showing the input.
Please don't show the entire output if it's long.
Example:
What domain do you want to use for the OpenShift hosts? openshift.example.com
Key Presses
Key presses:
ALL CAPS Use in-line code formatting Use a plus symbol (+) if keys need to be pressed simultaneously Examples:
Press ENTER.
To stop tailing the log file, press CTRL+C.
Variables Often you will need to highlight variables in your commands, config files, example URLs, etc. Any item that needs to be changed by the reader should be highlighted. However, please don't highlight every possible setting that can be changed if the default example is fine to copy. It's what the reader should change, not what the reader could change.
Use this symbol to highlight variables: <^>.
DigitalOcean's Markdown parser will use this symbol to turn text red, even in an otherwise unformatted block or line. This only works in-line; you would have to highlight each line to turn multiple lines red.
Markdown Example: (This is an image)
Highlighting example your highlighted code here
Result:
your highlighted code here If you reference a variable in a context where you would normally also use in-line code formatting, you should use both styles.
Use these examples throughout your tutorial. (These haven't always been used in all DO tutorials, but they're a good guideline.)
If you are writing a tutorial as part of a series, please use the same variables throughout the series.
Users
sammy is the default username.
You can also choose something descriptive, like webdav-kai or nsd. Please choose gender-neutral names or alternate between gendered names.
Use bold when you reference a specific user, especially if you are switching users.
Hostnames
your_server is the default hostname.
You are encouraged to choose something descriptive, especially in multi-server setups, like nsd_master or mysql_slave_1.
Domains
example.com is the default domain.
For multi-server setups, you can choose something like master-1.example.com or slave-1.example.com.
IP Addresses
your_server_ip is the default way to show an IP address. You should use in-line code with variable highlighting.
If you need to show multiple IPs, you can do it with formatting like master_private_ip and slave_private_ip.
If you need to illustrate more realistic IP addresses, you can use 111.111.111.111, 111.111.111.222, etc.
URLs
Example URLs, that contain a variable the reader needs to customize, should use code formatting with the variable highlighted.
Examples:
https://example.com:3000/simple/ http://your_server_ip/ If it's a live link, use a standard Markdown link instead, without code formatting.
Liens
fr:Créer un lien he:יצירת קישור ro:Creaţi un link ru:Создайте ссылку pl:Utwórz łącze ja:リンクを作成します。 ar:إنشاء ارتباط zh:创建链接 de:Erstellen einer Verknüpfung nl:Een koppeling maken it:Creare un link pt:Criar um link es:Crear un vínculo en:Create a link
Il existe deux types de liens :
- liens internes : qui pointe vers une page ou une section au sein des articles ikoula.wiki.
- liens externes : qui pointent vers un site tiers.
Liens internes
Les liens internes sont les liens qui pointent vers un autre article de Wikipédia. Les liens internes connexes à un article sont regroupés en fin d'article dans une sous-rubrique Articles connexes de la rubrique Voir aussi. Dans le cas où la rubrique Voir aussi ne présente pas de liens externes, on admet qu'elle soit utilisée pour les articles connexes.
[[Nom de l'article]]
|
Il est aussi possible de faire un lien interne à l'article (lien ancré) en utilisant un titre de section avec la syntaxe [[#Nom de la section]], ou vers une section d'un autre article de Wikipédia avec la syntaxe suivante :
[[Nom de l'article#Nom de la section]]
|
Pour faire apparaître un texte quelconque à la place du titre du lien, on peut utiliser la barre verticale (pipe) (|).
[[Wikipédia|texte à faire apparaître]]
|
texte à faire apparaître
|
Liens externes
Les liens externes sont des hyperliens qui mènent vers d'autres sites web que celui dans lequel se trouve la page. Dans les articles de ce site, on peut en trouver à deux endroits : dans la liste des références, et en fin d'article comme dans la rubrique « Voir aussi ».
| Exemple | Résultat |
|---|---|
[https://ikoula.wiki le wiki] |
|
http://ikoula.com |
|
[https://support.ikoula.com] |
GUIs
If your tutorial references a graphical user interface (GUI), you should include screenshots. You don't have to include a new screenshot for every single button, field, or link, but show enough that the reader can navigate the interface easily.
You can add arrows and outlines to the image to improve comprehension.
Please use bold text to refer to any element in the GUI, whether that is a button, link, checkbox, tab, popup text, or anything else.
Please specify the type of element you're referencing and its location on the page.
Example:
Select DNS from the left navigation menu. Then click anywhere in the IP address area (104.131.240.129 in the example) to edit the A record for the subdomain subdomain entry.
Click in the IP address area to edit the subdomain record
Press ENTER to save your change. The message Domain record was successfully updated will appear at the top of the screen.
For nested menus, it's fine to say something like:
From the top navigation menu, go to Settings > Networking > Domains.
Don't assume your reader is familiar with the GUI; that's why they're reading a tutorial about it.
Images and Other Assets
The general format for including an image is as follows. Please include descriptive alt text so readers using a screen reader can rely on the alt text rather than the image.
Markdown Example:
 Screenshots and other images:
Use the .png file format Max size of 745x745 pixels Make the image with as short a height as possible Larger images should be broken into multiple images or resized Borders are not required, but if one would make the image clearer, use #eeeeee, 1px Host images on imgur DigitalOcean will take care of uploading images to our servers Types of images:
GUI images
Technical diagrams Terminal menus that can't be copied Please do not include images of the console. Commands and output should be included as code-style text so they can be copied. Below are three good examples of images, including a technical diagram and a terminal menu that have been uploaded by DigitalOcean, and a GUI image hosted on imgur.
Markdown Example:
 Result:
The haproxy-www load balancer sits in front of two WordPress servers, wordpress-1 and wordpress-2, which connect to the same mysql-1 database server backend
Markdown Example:
 Result:
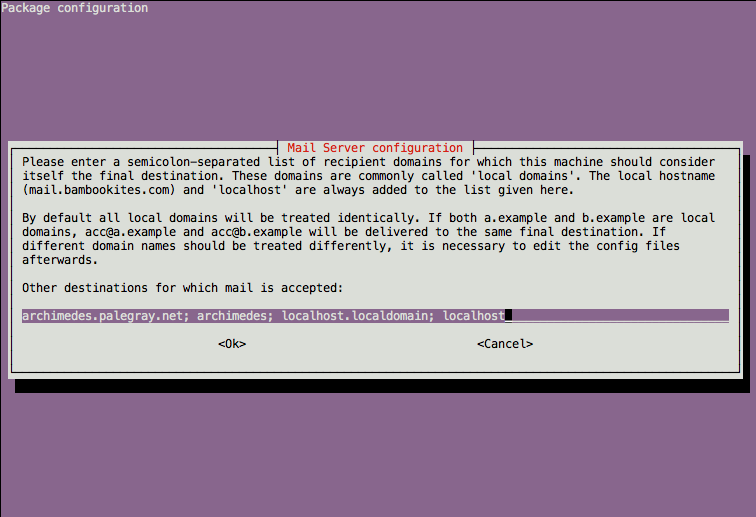
Enter your mail destinations and then select <Ok>
Markdown Example:
 Result:
Click in the IP address area to edit the subdomain record
If you want a diagram for your tutorial, you can provide a mockup, and we can create a diagram that matches our style.
Other assets:
Occasionally you will want the reader to have access to a configuration file that is too long to display in the main body of the tutorial. DigitalOcean will host this file on our asset server. You can use standard link formatting to link to the file.
Styles
Follow these conventions for when to use various element styles. Code styles are used in a variety of ways, so please see the earlier section for details about block and in-line code formatting.
You can format your text by using wiki markup. This consists of normal characters like asterisks, apostrophes or equal signs which have a special function in the wiki, sometimes depending on their position.
Gras
Voici comment mettre un terme en gras dans votre article.
Exemple wikitext :
'''texte en gras'''
Résultat :
texte en gras
Voici une liste d'éléments qui devraient être en gras.
- Texte visible d'une GUI
- Changement de contexte pour une commande, tel que changer d'utilisateur ou de serveur
- Noms d'hôte comme serveur-1
- Utilisateurs comme ikoula
- Prompts
- Liste de termes, comme :
- MySQL: moteur de base de données
- Apache: serveur web
- Eléments que le lecteur ne doit pas rater, sans trop en faire.
Italique
L'italique ne devrait être utilisé que pour introduire les termes techniques. Ex. : le serveur nginx sera utilisé comme reverse proxy.
Exemple wikitext :
''texte en italique''
Résultat :
texte en italique
Notes et avertissements
L'utilisation de certaines balises HTML peuvent être nécessaire pour mettre en évidence certains éléments tels que des notes ou des avertissements.
Exemple wikitext + HTML :
<div style="background-color: #FFCC99;"> '''Note''': Ceci est une note.</div>
<div style="background-color: #FF9999;"> '''Warning''': Ceci est un avertissement.</div>
Résultat :
Blockquotes
You may use blockquotes to set the indent the text, which is useful for calling out important content.
Exemple wikitext :
Texte important
Résultat :
Texte important
Referring to Software
Use the official capitalization of the software name from its website if available. If the product website is not consistent, please be consistent within a single article. We capitalize the first letter of Nginx.
If you are referencing the software by name, please capitalize it properly. On the other hand, you don't have to capitalize commands and package names.
Example:
A MySQL database vs. the mysql command or the mysql-server package.
Listes
A chaque type de liste son utilisation.
Listes non-ordonnées
Exemple wikitext :
* élément 1
* élément 2
Résultat :
- élément 1
- élément 2
Ces listes sont utiles pour :
- les prérequis
- les checklists
Listes de définitions
Exemple wikitext :
;mot 1
: définition 1
;mot 2
: définition 2-1
: définition 2-2
Ces listes sont utiles pour :
- les termes et explications
- explications pour les variables dans une ligne de commande ou un fichier
Listes ordonnées
Les listes ordonnées sont à utiliser avec parcimonie. Elles peuvent s'avérer pratiques pour lister l'ordre d'un processus, tel que le traitement d'une requête DNS.
Exemple wikitext :
# élément 1
# élément 2
Résultat :
- élément 1
- élément 2
Ces listes sont utiles pour :
- décrire un processus de traitement
Dans certains cas, l’utilisation d'un tableau sera préférable aux listes.
Conclusion
Write a brief conclusion for your tutorial to summarize what has been accomplished, and what the reader might want to do next.
That's all! Check out the Style Guide, and happy writing!
Cet article vous a semblé utile ?
Activer l'actualisation automatique des commentaires