Différences entre versions de « Utiliser Panamax sur Cloudstack by Ikoula »
| (30 versions intermédiaires par 4 utilisateurs non affichées) | |||
| Ligne 1 : | Ligne 1 : | ||
| − | + | <span data-link_translate_fr_title="Utiliser Panamax sur Cloudstack by Ikoula" data-link_translate_fr_url="Utiliser Panamax sur Cloudstack by Ikoula"></span>[[:fr:Utiliser Panamax sur Cloudstack by Ikoula]][[fr:Utiliser Panamax sur Cloudstack by Ikoula]] | |
| + | <span data-link_translate_he_title="השתמש Cloudstack על ידי Ikoula פנמקס" data-link_translate_he_url="%D7%94%D7%A9%D7%AA%D7%9E%D7%A9+Cloudstack+%D7%A2%D7%9C+%D7%99%D7%93%D7%99+Ikoula+%D7%A4%D7%A0%D7%9E%D7%A7%D7%A1"></span>[[:he:השתמש Cloudstack על ידי Ikoula פנמקס]][[he:השתמש Cloudstack על ידי Ikoula פנמקס]] | ||
| + | <span data-link_translate_ro_title="Utilizarea Cloudstack de Ikoula Panamax" data-link_translate_ro_url="Utilizarea+Cloudstack+de+Ikoula+Panamax"></span>[[:ro:Utilizarea Cloudstack de Ikoula Panamax]][[ro:Utilizarea Cloudstack de Ikoula Panamax]] | ||
| + | <span data-link_translate_ru_title="Использование Cloudstack по Ikoula Panamax" data-link_translate_ru_url="%D0%98%D1%81%D0%BF%D0%BE%D0%BB%D1%8C%D0%B7%D0%BE%D0%B2%D0%B0%D0%BD%D0%B8%D0%B5+Cloudstack+%D0%BF%D0%BE+Ikoula+Panamax"></span>[[:ru:Использование Cloudstack по Ikoula Panamax]][[ru:Использование Cloudstack по Ikoula Panamax]] | ||
| + | <span data-link_translate_pl_title="Użyj Cloudstack przez Ikoula Panamax" data-link_translate_pl_url="U%C5%BCyj+Cloudstack+przez+Ikoula+Panamax"></span>[[:pl:Użyj Cloudstack przez Ikoula Panamax]][[pl:Użyj Cloudstack przez Ikoula Panamax]] | ||
| + | <span data-link_translate_ja_title="Ikoula パナマックスで Cloudstack を使用します。" data-link_translate_ja_url="Ikoula+%E3%83%91%E3%83%8A%E3%83%9E%E3%83%83%E3%82%AF%E3%82%B9%E3%81%A7+Cloudstack+%E3%82%92%E4%BD%BF%E7%94%A8%E3%81%97%E3%81%BE%E3%81%99%E3%80%82"></span>[[:ja:Ikoula パナマックスで Cloudstack を使用します。]][[ja:Ikoula パナマックスで Cloudstack を使用します。]] | ||
| + | <span data-link_translate_ar_title="استخدام كلودستاك ببنما عكلة" data-link_translate_ar_url="%D8%A7%D8%B3%D8%AA%D8%AE%D8%AF%D8%A7%D9%85+%D9%83%D9%84%D9%88%D8%AF%D8%B3%D8%AA%D8%A7%D9%83+%D8%A8%D8%A8%D9%86%D9%85%D8%A7+%D8%B9%D9%83%D9%84%D8%A9"></span>[[:ar:استخدام كلودستاك ببنما عكلة]][[ar:استخدام كلودستاك ببنما عكلة]] | ||
| + | <span data-link_translate_zh_title="使用由 Ikoula 巴拿马 Cloudstack" data-link_translate_zh_url="%E4%BD%BF%E7%94%A8%E7%94%B1+Ikoula+%E5%B7%B4%E6%8B%BF%E9%A9%AC+Cloudstack"></span>[[:zh:使用由 Ikoula 巴拿马 Cloudstack]][[zh:使用由 Ikoula 巴拿马 Cloudstack]] | ||
| + | <span data-link_translate_de_title="Verwenden von Cloudstack von Ikoula Panamax" data-link_translate_de_url="Verwenden+von+Cloudstack+von+Ikoula+Panamax"></span>[[:de:Verwenden von Cloudstack von Ikoula Panamax]][[de:Verwenden von Cloudstack von Ikoula Panamax]] | ||
| + | <span data-link_translate_nl_title="Cloudstack door Ikoula Panamax gebruiken" data-link_translate_nl_url="Cloudstack+door+Ikoula+Panamax+gebruiken"></span>[[:nl:Cloudstack door Ikoula Panamax gebruiken]][[nl:Cloudstack door Ikoula Panamax gebruiken]] | ||
| + | <span data-link_translate_it_title="Utilizzare Cloudstack da Ikoula Panamax" data-link_translate_it_url="Utilizzare+Cloudstack+da+Ikoula+Panamax"></span>[[:it:Utilizzare Cloudstack da Ikoula Panamax]][[it:Utilizzare Cloudstack da Ikoula Panamax]] | ||
| + | <span data-link_translate_pt_title="Usar o Cloudstack por Ikoula Panamax" data-link_translate_pt_url="Usar+o+Cloudstack+por+Ikoula+Panamax"></span>[[:pt:Usar o Cloudstack por Ikoula Panamax]][[pt:Usar o Cloudstack por Ikoula Panamax]] | ||
| + | <span data-link_translate_es_title="Uso de Cloudstack por Ikoula Panamax" data-link_translate_es_url="Uso+de+Cloudstack+por+Ikoula+Panamax"></span>[[:es:Uso de Cloudstack por Ikoula Panamax]][[es:Uso de Cloudstack por Ikoula Panamax]] | ||
| + | <span data-link_translate_en_title="Use Cloudstack by Ikoula Panamax" data-link_translate_en_url="Use+Cloudstack+by+Ikoula+Panamax"></span>[[:en:Use Cloudstack by Ikoula Panamax]][[en:Use Cloudstack by Ikoula Panamax]] | ||
| + | {{#seo: | ||
| + | |title=Utiliser Panamax sur Cloudstack by Ikoula | ||
| + | |title_mode=append | ||
| + | |keywords=these,are,your,keywords | ||
| + | |description=Comment utiliser Panamax sur Cloudstack by Ikoula | ||
| + | |image=Uploaded_file.png | ||
| + | |image_alt=Wiki Logo | ||
| + | }} | ||
| + | |||
| + | <!--T:1--> | ||
| + | Si vous ne connaissez pas encore [http://panamax.io/ Panamax] il s'agit d'un produit <span class="notranslate">Open Source</span> développé par <span class="notranslate">Century Link Labs</span> qui est à la fois une market place et un gestionnaire pour applications conteneurisées Docker depuis une interface web intuitive. | ||
| + | |||
| + | |||
| + | <!--T:2--> | ||
Il suffit en effet de chercher l'application de notre choix puis d'un clique pour la déployer sur nos instances cibles à l'aide de docker et d'un agent Panamax. | Il suffit en effet de chercher l'application de notre choix puis d'un clique pour la déployer sur nos instances cibles à l'aide de docker et d'un agent Panamax. | ||
| − | Panamax s'appuie sur les technologies Docker, Etcd, Fleet et Cloud-init incluses dans CoreOS. | + | <!--T:3--> |
| + | Panamax s'appuie sur les technologies Docker, Etcd, <span class="notranslate">Fleet</span> et Cloud-init incluses dans CoreOS. | ||
| − | Nous utiliserons dans notre exemple une | + | <!--T:4--> |
| + | Nous utiliserons dans notre exemple 4 instances CoreOS [https://ikoula.wiki/help/Mettre_a_jour_CoreOS_manuellement à jour], une pour la partie cliente/Panamax UI et les 3 autres qui formeront le <span class="notranslate">cluster</span> pour la partie <span class="notranslate">Panamax Remote Target (Panamax Remote Agent + Panamax Adapter)</span> : | ||
| − | == | + | ==Installation de Panamax UI/API (interface web/market place)== <!--T:5--> |
| − | Sur notre instance | + | <!--T:6--> |
| + | Sur notre instance dédiée à la partie cliente de Panamax (Panamax UI/API), on télécharge l'archive comprenant l'installateur : | ||
| + | <!--T:7--> | ||
<syntaxhighlight lang="bash"> | <syntaxhighlight lang="bash"> | ||
| − | core@ | + | core@CoreOS-PanamaxUI ~ $ sudo curl -O http://download.panamax.io/installer/panamax-latest.tar.gz |
| − | % Total % Received % Xferd Average Speed Time Time Time | + | % Total % Received % Xferd Average Speed Time Time Time Current |
Dload Upload Total Spent Left Speed | Dload Upload Total Spent Left Speed | ||
| − | 100 | + | 100 15165 100 15165 0 0 22157 0 --:--:-- --:--:-- --:--:-- 49558 |
| − | |||
| − | |||
| − | |||
| − | |||
| − | |||
| − | |||
| − | |||
| − | |||
| − | |||
| − | |||
| − | |||
| − | |||
| − | |||
| − | |||
</syntaxhighlight> | </syntaxhighlight> | ||
| − | + | <!--T:8--> | |
| + | On crée le répertoire /var/panamax dans lequel on extrait les fichiers d'installation : | ||
| + | <!--T:9--> | ||
<syntaxhighlight lang="bash"> | <syntaxhighlight lang="bash"> | ||
| − | core@ | + | core@CoreOS-PanamaxUI ~ $ sudo mkdir -p /var/panamax |
| + | core@CoreOS-PanamaxUI ~ $ sudo tar -C /var/panamax -zxvf panamax-latest.tar.gz | ||
| + | ./ | ||
| + | ./Makefile | ||
| + | ./configure | ||
| + | ./create-docker-mount | ||
| + | ./LICENSE | ||
| + | ./desktop | ||
| + | ./panamax | ||
| + | ./.coreosenv | ||
| + | ./README.md | ||
| + | ./CHANGELOG.md | ||
| + | ./ubuntu.sh | ||
| + | ./Vagrantfile | ||
| + | ./.version | ||
| + | ./coreos | ||
| + | ./Vagrantfile-win | ||
| + | ./CONTRIBUTING.md | ||
</syntaxhighlight> | </syntaxhighlight> | ||
| − | On lance l'installateur spécifique à CoreOS en précisant qu'on veut utiliser la version stable : | + | <!--T:10--> |
| + | On se place dans le répertoire /var/panamax et on lance l'installateur spécifique à CoreOS en précisant qu'on veut utiliser la version stable (sortie tronquée volontairement) : | ||
| + | <!--T:11--> | ||
<syntaxhighlight lang="bash"> | <syntaxhighlight lang="bash"> | ||
| − | + | core@CoreOS-PanamaxUI ~ $ cd /var/panamax | |
| + | core@CoreOS-PanamaxUI /var/panamax $ sudo ./coreos install --stable | ||
Installing Panamax... | Installing Panamax... | ||
| + | Created symlink from /etc/systemd/system/update-engine-reboot-manager.service to /dev/null. | ||
| + | Created symlink from /etc/systemd/system/update-engine.service to /dev/null. | ||
| + | Created symlink from /etc/systemd/system/sockets.target.wants/systemd-journal-gatewayd.socket to /usr/lib64/systemd/system/systemd- | ||
| + | <!--T:12--> | ||
docker pull centurylink/panamax-api:latest | docker pull centurylink/panamax-api:latest | ||
| − | .. | + | ................. |
docker pull centurylink/panamax-ui:latest | docker pull centurylink/panamax-ui:latest | ||
| − | .. | + | ..... |
| − | + | docker pull google/cadvisor:0.13.0 | |
| − | docker pull google/cadvisor:0. | + | ......... |
| − | .. | + | docker pull centurylink/redis:latest |
| − | Created symlink from /etc/systemd/system/multi-user.target.wants/panamax- | + | .... |
| + | docker pull centurylink/dray:latest | ||
| + | ...Created symlink from /etc/systemd/system/multi-user.target.wants/panamax-redis.service to /etc/systemd/system/panamax-redis.serv | ||
| + | Created symlink from /etc/systemd/system/multi-user.target.wants/panamax-dray.service to /etc/systemd/system/panamax-dray.service. | ||
| + | Created symlink from /etc/systemd/system/multi-user.target.wants/panamax-metrics.service to /etc/systemd/system/panamax-metrics.ser | ||
Created symlink from /etc/systemd/system/multi-user.target.wants/panamax-api.service to /etc/systemd/system/panamax-api.service. | Created symlink from /etc/systemd/system/multi-user.target.wants/panamax-api.service to /etc/systemd/system/panamax-api.service. | ||
Created symlink from /etc/systemd/system/multi-user.target.wants/panamax-ui.service to /etc/systemd/system/panamax-ui.service. | Created symlink from /etc/systemd/system/multi-user.target.wants/panamax-ui.service to /etc/systemd/system/panamax-ui.service. | ||
| − | + | ... | |
| − | + | Jul 10 11:45:39 CoreOS-PanamaxUI docker[1790]: => Rails 4.1.7 application starting in production on http://0.0.0.0:3000 | |
| − | + | Jul 10 11:45:39 CoreOS-PanamaxUI docker[1790]: => Run `rails server -h` for more startup options | |
| − | + | Jul 10 11:45:39 CoreOS-PanamaxUI docker[1790]: => Notice: server is listening on all interfaces (0.0.0.0). Consider using 127.0.0.1 (--binding option) | |
| − | + | Jul 10 11:45:39 CoreOS-PanamaxUI docker[1790]: => Ctrl-C to shutdown server | |
| − | |||
| − | |||
| − | |||
| − | |||
| − | |||
| − | |||
| − | |||
| − | |||
| − | |||
| − | |||
| − | |||
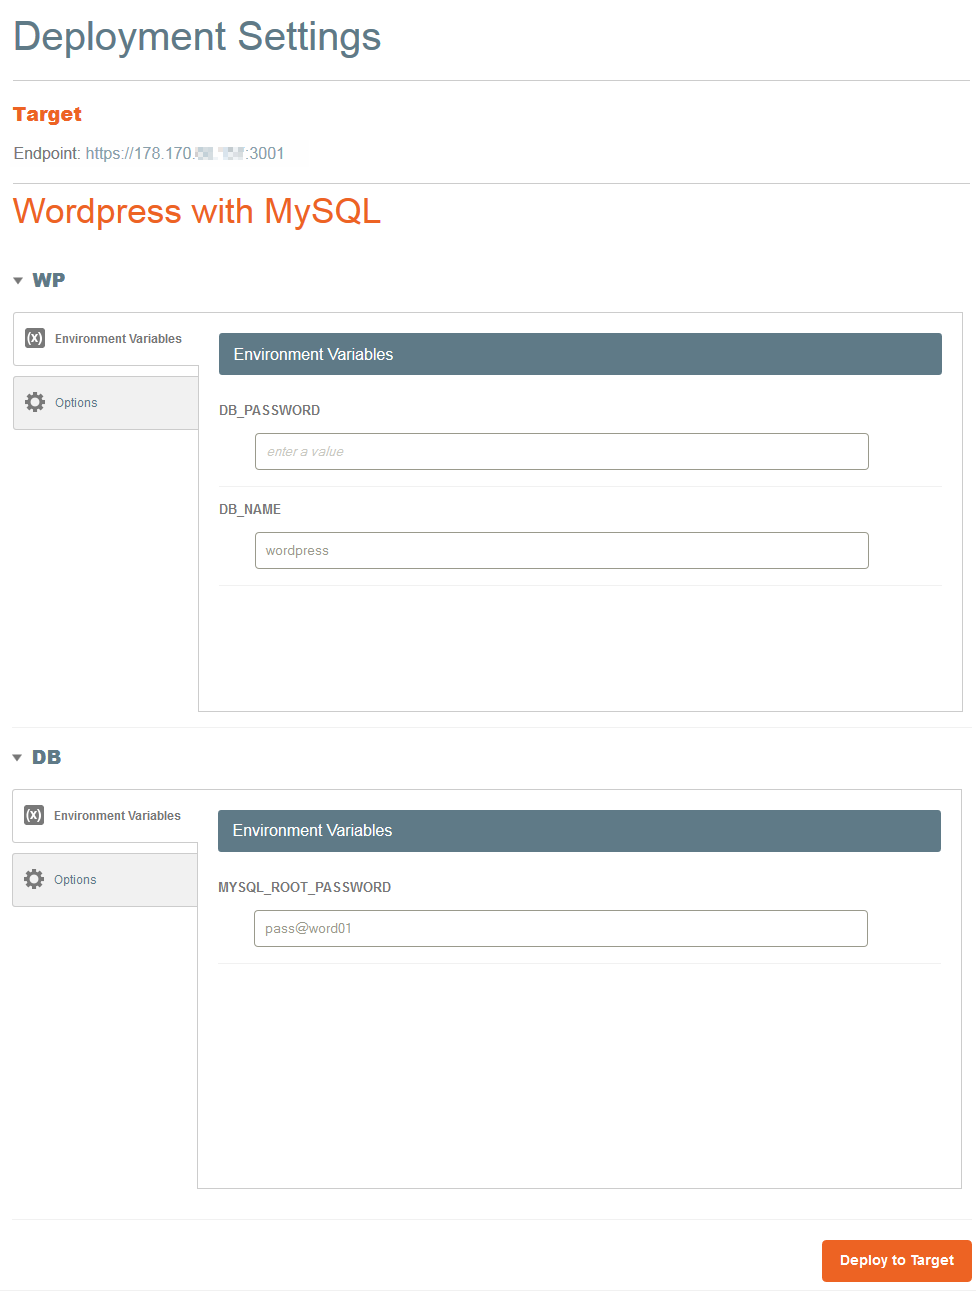
| − | |||
| − | |||
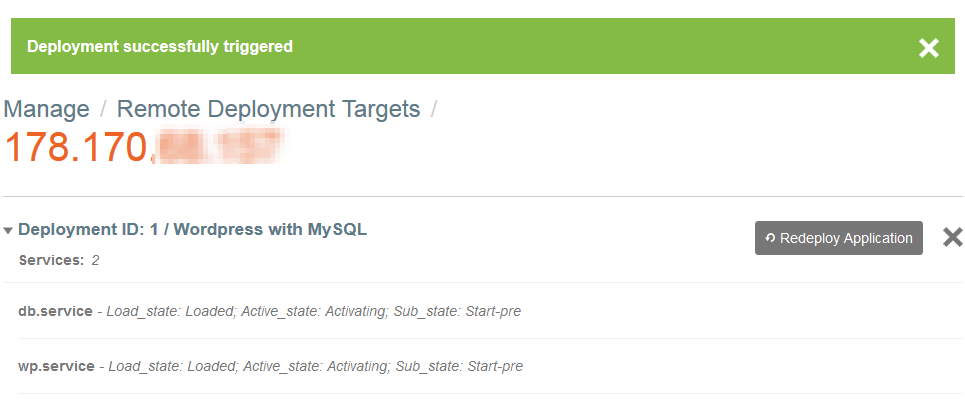
| − | |||
| − | |||
| − | |||
| − | |||
| − | |||
| − | |||
| − | |||
| − | |||
| − | |||
| − | |||
| − | |||
| − | |||
| − | |||
| − | |||
Panamax install complete | Panamax install complete | ||
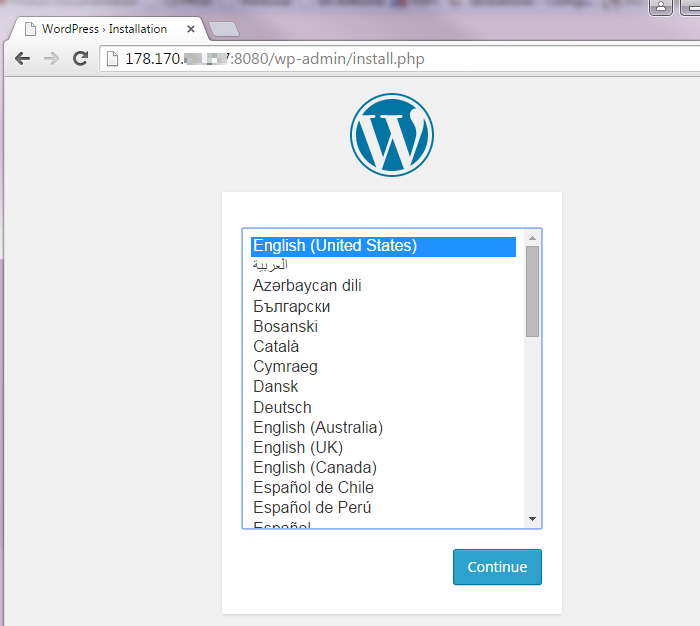
| − | + | core@CoreOS-PanamaxUI /var/panamax $ | |
</syntaxhighlight> | </syntaxhighlight> | ||
| − | Nous pouvons vérifier que nos | + | <!--T:13--> |
| + | Nous pouvons vérifier que nos 5 containers Panamax sont bien en cours d'exécution : | ||
| + | <!--T:14--> | ||
<syntaxhighlight lang="bash"> | <syntaxhighlight lang="bash"> | ||
| − | + | core@CoreOS-PanamaxUI /var/panamax $ docker ps | |
| − | CONTAINER ID IMAGE COMMAND CREATED | + | CONTAINER ID IMAGE COMMAND CREATED STATUS PORTS NAMES |
| − | + | 41a18b410427 centurylink/panamax-ui:latest "/bin/sh -c 'bundle 3 minutes ago Up 3 minutes 0.0.0.0:3000->3000/tcp PMX_UI | |
| − | + | 0cc8befee1b7 centurylink/panamax-api:latest "/bin/sh -c 'bundle 3 minutes ago Up 3 minutes 0.0.0.0:3001->3000/tcp PMX_API | |
| − | + | 0929e65f6d55 google/cadvisor:0.13.0 "/usr/bin/cadvisor" 3 minutes ago Up 3 minutes 0.0.0.0:3002->8080/tcp PMX_CADVISOR | |
| + | 06b2219ac42e centurylink/dray:0.10.0 "/dray" 3 minutes ago Up 3 minutes 0.0.0.0:3003->3000/tcp PMX_DRAY | ||
| + | 8a6110651dcc centurylink/redis:latest "redis-server" 3 minutes ago Up 3 minutes 6379/tcp PMX_DRAY_REDIS | ||
</syntaxhighlight> | </syntaxhighlight> | ||
| + | <!--T:15--> | ||
Nous pouvons nous connecter à notre UI Panamax à l'aide de notre navigateur en tappant l'ip de notre instance suivit de ":3000" pour préciser le port d'écoute (n'oubliez pas de créer des règles d'autorisations parefeu et une redirection de port si besoin) de celle-ci : | Nous pouvons nous connecter à notre UI Panamax à l'aide de notre navigateur en tappant l'ip de notre instance suivit de ":3000" pour préciser le port d'écoute (n'oubliez pas de créer des règles d'autorisations parefeu et une redirection de port si besoin) de celle-ci : | ||
| + | <!--T:16--> | ||
[[File:panamax-ui.png]] | [[File:panamax-ui.png]] | ||
| − | == | + | ==Installation de <span class="notranslate">Panamax Remote Deployment Target</span>== <!--T:17--> |
| − | Connectez-vous à l'une de vos 3 instances CoreOS déployées pour le cluster : | + | <!--T:18--> |
| + | Connectez-vous à l'une de vos 3 instances CoreOS déployées pour le <span class="notranslate">cluster</span> : | ||
| − | Générer une nouvelle URL de discovery Etcd (tokens) dans une variable (ici: ETCD_URL) : | + | <!--T:19--> |
| + | Générer une nouvelle URL de <span class="notranslate">discovery Etcd</span> (tokens) dans une variable (ici: ETCD_URL) : | ||
| + | <!--T:20--> | ||
<syntaxhighlight lang="bash"> | <syntaxhighlight lang="bash"> | ||
core@CoreOSnode-1 ~ $ ETCD_URL=$(curl http://discovery.etcd.io/new) | core@CoreOSnode-1 ~ $ ETCD_URL=$(curl http://discovery.etcd.io/new) | ||
| Ligne 140 : | Ligne 169 : | ||
| − | Puis téléchargez le fichier | + | <!--T:21--> |
| + | Puis téléchargez le fichier {{Template:Cloud}}-config.yml template suivant : | ||
| + | <!--T:22--> | ||
<syntaxhighlight lang="bash"> | <syntaxhighlight lang="bash"> | ||
core@CoreOSnode-1 ~ $ sudo wget -NP /usr/share/oem/ http://mirror02.ikoula.com/priv/coreos/cloud-config.yml | core@CoreOSnode-1 ~ $ sudo wget -NP /usr/share/oem/ http://mirror02.ikoula.com/priv/coreos/cloud-config.yml | ||
| Ligne 152 : | Ligne 183 : | ||
Remote file is newer, retrieving. | Remote file is newer, retrieving. | ||
| + | <!--T:23--> | ||
--2015-06-16 15:37:53-- http://mirror02.ikoula.com/priv/coreos/cloud-config.yml | --2015-06-16 15:37:53-- http://mirror02.ikoula.com/priv/coreos/cloud-config.yml | ||
Reusing existing connection to mirror02.ikoula.com:80. | Reusing existing connection to mirror02.ikoula.com:80. | ||
| Ligne 158 : | Ligne 190 : | ||
Saving to: '/usr/share/oem/cloud-config.yml' | Saving to: '/usr/share/oem/cloud-config.yml' | ||
| + | <!--T:24--> | ||
/usr/share/oem/cloud-config.yml 100%[===================================================================================================>] 1.51K --.-KB/s in 0s | /usr/share/oem/cloud-config.yml 100%[===================================================================================================>] 1.51K --.-KB/s in 0s | ||
| + | <!--T:25--> | ||
2015-06-16 15:37:53 (264 MB/s) - '/usr/share/oem/cloud-config.yml' saved [1542/1542] | 2015-06-16 15:37:53 (264 MB/s) - '/usr/share/oem/cloud-config.yml' saved [1542/1542] | ||
</syntaxhighlight> | </syntaxhighlight> | ||
| + | <!--T:26--> | ||
<syntaxhighlight lang="bash"> | <syntaxhighlight lang="bash"> | ||
core@CoreOSnode-1 ~ $ export `cat /etc/environment` | core@CoreOSnode-1 ~ $ export `cat /etc/environment` | ||
</syntaxhighlight> | </syntaxhighlight> | ||
| − | Exécutez les commandes suivantes pour personnaliser le fichier | + | <!--T:27--> |
| + | Exécutez les commandes suivantes pour personnaliser le fichier {{Template:Cloud}}-config.yml téléchargé avec les valeurs propres à votre environnement : | ||
| + | <!--T:28--> | ||
<syntaxhighlight lang="bash"> | <syntaxhighlight lang="bash"> | ||
core@CoreOSnode-1 ~ $ sudo sed -i 's#DISCOVERY_URL#'$ETCD_URL'#g' /usr/share/oem/cloud-config.yml | core@CoreOSnode-1 ~ $ sudo sed -i 's#DISCOVERY_URL#'$ETCD_URL'#g' /usr/share/oem/cloud-config.yml | ||
| Ligne 174 : | Ligne 211 : | ||
</syntaxhighlight> | </syntaxhighlight> | ||
| − | On vérifie que nos paramètres Etcd et Fleet on bien été substitués : | + | <!--T:29--> |
| + | On vérifie que nos paramètres Etcd et <span class="notranslate">Fleet</span> on bien été substitués : | ||
| + | <!--T:30--> | ||
<syntaxhighlight lang="bash"> | <syntaxhighlight lang="bash"> | ||
core@CoreOSnode-1 ~ $ cat /usr/share/oem/cloud-config.yml | core@CoreOSnode-1 ~ $ cat /usr/share/oem/cloud-config.yml | ||
#cloud-config | #cloud-config | ||
| + | <!--T:31--> | ||
coreos: | coreos: | ||
units: | units: | ||
| Ligne 189 : | Ligne 229 : | ||
Description=Sets SSH key from metadata | Description=Sets SSH key from metadata | ||
| − | [Service] | + | <!--T:32--> |
| + | [Service] | ||
Type=oneshot | Type=oneshot | ||
StandardOutput=journal+console | StandardOutput=journal+console | ||
| Ligne 200 : | Ligne 241 : | ||
Description=Sets hostname from metadata | Description=Sets hostname from metadata | ||
| − | [Service] | + | <!--T:33--> |
| + | [Service] | ||
Type=oneshot | Type=oneshot | ||
StandardOutput=journal+console | StandardOutput=journal+console | ||
| Ligne 213 : | Ligne 255 : | ||
After=coreos-setup-environment.service | After=coreos-setup-environment.service | ||
| − | [Service] | + | <!--T:34--> |
| + | [Service] | ||
Type=oneshot | Type=oneshot | ||
EnvironmentFile=/etc/environment | EnvironmentFile=/etc/environment | ||
| Ligne 236 : | Ligne 279 : | ||
| + | <!--T:35--> | ||
Supprimez le fichier /etc/machine-id puis rebootez l'instance afin de regénérer un nouvel id de machine (vos 3 instances devront avoir un id différent) : | Supprimez le fichier /etc/machine-id puis rebootez l'instance afin de regénérer un nouvel id de machine (vos 3 instances devront avoir un id différent) : | ||
| + | <!--T:36--> | ||
<syntaxhighlight lang="bash"> | <syntaxhighlight lang="bash"> | ||
core@CoreOSnode-1 ~ $ sudo rm -f /etc/machine-id | core@CoreOSnode-1 ~ $ sudo rm -f /etc/machine-id | ||
| Ligne 245 : | Ligne 290 : | ||
| − | Votre première instance devrait apparaître dans la liste des machines gérées dans Fleet : | + | <!--T:37--> |
| + | Votre première instance devrait apparaître dans la liste des machines gérées dans <span class="notranslate">Fleet</span> : | ||
| + | <!--T:38--> | ||
<syntaxhighlight lang="bash"> | <syntaxhighlight lang="bash"> | ||
core@CoreOSnode-1 ~ $ fleetctl list-machines | core@CoreOSnode-1 ~ $ fleetctl list-machines | ||
| Ligne 255 : | Ligne 302 : | ||
| − | Ici nous voyons bien notre première instance dans la liste des machines Fleet, ce sera donc notre instance qui initialisera notre cluster CoreOS/Etcd/Fleet. | + | <!--T:39--> |
| + | Ici nous voyons bien notre première instance dans la liste des machines <span class="notranslate">Fleet</span>, ce sera donc notre instance qui initialisera notre <span class="notranslate">cluster</span> CoreOS/Etcd/Fleet. | ||
| − | Configurez maintenant vos deux autres instances CoreOS remote deployment target en suivant les instructions ci-dessous : | + | <!--T:40--> |
| + | Configurez maintenant vos deux autres instances <span class="notranslate">CoreOS remote deployment target</span> en suivant les instructions ci-dessous : | ||
| − | Connectez-vous à vos deux autres instances puis recopiez le contenu du fichier /usr/share/oem/ | + | <!--T:41--> |
| + | Connectez-vous à vos deux autres instances puis recopiez le contenu du fichier /usr/share/oem/{{Template:Cloud}}-config.yml de votre première instance en remplaçant uniquement l'ip de celle-ci par l'ip de votre seconde instance sur votre seconde instance et par l'ip de votre troisième instance sur votre troisième instance (vous devrez passer root via un "sudo su") : | ||
| − | Sur notre seconde instance (adresse ip 178.170.XX.YYY) le fichier /usr/share/oem/ | + | <!--T:42--> |
| + | Sur notre seconde instance (adresse ip 178.170.XX.YYY) le fichier /usr/share/oem/{{Template:Cloud}}-config.yml aura donc le contenu suivant (identique sauf l'adresse ip) : | ||
| + | <!--T:43--> | ||
<syntaxhighlight lang="bash"> | <syntaxhighlight lang="bash"> | ||
core@CoreOSnode-2 ~ $ cat /usr/share/oem/cloud-config.yml | core@CoreOSnode-2 ~ $ cat /usr/share/oem/cloud-config.yml | ||
#cloud-config | #cloud-config | ||
| + | <!--T:44--> | ||
coreos: | coreos: | ||
units: | units: | ||
| Ligne 280 : | Ligne 333 : | ||
Description=Sets SSH key from metadata | Description=Sets SSH key from metadata | ||
| − | [Service] | + | <!--T:45--> |
| + | [Service] | ||
Type=oneshot | Type=oneshot | ||
StandardOutput=journal+console | StandardOutput=journal+console | ||
| Ligne 291 : | Ligne 345 : | ||
Description=Sets hostname from metadata | Description=Sets hostname from metadata | ||
| − | [Service] | + | <!--T:46--> |
| + | [Service] | ||
Type=oneshot | Type=oneshot | ||
StandardOutput=journal+console | StandardOutput=journal+console | ||
| Ligne 304 : | Ligne 359 : | ||
After=coreos-setup-environment.service | After=coreos-setup-environment.service | ||
| − | [Service] | + | <!--T:47--> |
| + | [Service] | ||
Type=oneshot | Type=oneshot | ||
EnvironmentFile=/etc/environment | EnvironmentFile=/etc/environment | ||
| Ligne 327 : | Ligne 383 : | ||
| − | Sur notre troisième instance (adresse ip 178.170.XX.ZZZ) le fichier /usr/share/oem/ | + | <!--T:48--> |
| + | Sur notre troisième instance (adresse ip 178.170.XX.ZZZ) le fichier /usr/share/oem/{{Template:Cloud}}-config.yml aura donc le contenu suivant (identique aux 2 autres sauf l'adresse ip) : | ||
| + | <!--T:49--> | ||
<syntaxhighlight lang="bash"> | <syntaxhighlight lang="bash"> | ||
core@CoreOSnode-3 ~ $ cat /usr/share/oem/cloud-config.yml | core@CoreOSnode-3 ~ $ cat /usr/share/oem/cloud-config.yml | ||
#cloud-config | #cloud-config | ||
| + | <!--T:50--> | ||
coreos: | coreos: | ||
units: | units: | ||
| Ligne 343 : | Ligne 402 : | ||
Description=Sets SSH key from metadata | Description=Sets SSH key from metadata | ||
| − | [Service] | + | <!--T:51--> |
| + | [Service] | ||
Type=oneshot | Type=oneshot | ||
StandardOutput=journal+console | StandardOutput=journal+console | ||
| Ligne 354 : | Ligne 414 : | ||
Description=Sets hostname from metadata | Description=Sets hostname from metadata | ||
| − | [Service] | + | <!--T:52--> |
| + | [Service] | ||
Type=oneshot | Type=oneshot | ||
StandardOutput=journal+console | StandardOutput=journal+console | ||
| Ligne 367 : | Ligne 428 : | ||
After=coreos-setup-environment.service | After=coreos-setup-environment.service | ||
| − | [Service] | + | <!--T:53--> |
| + | [Service] | ||
Type=oneshot | Type=oneshot | ||
EnvironmentFile=/etc/environment | EnvironmentFile=/etc/environment | ||
| Ligne 390 : | Ligne 452 : | ||
| + | <!--T:54--> | ||
Comme pour votre première instance, supprimez le fichier /etc/machine-id et redémarrez l'instance : | Comme pour votre première instance, supprimez le fichier /etc/machine-id et redémarrez l'instance : | ||
| + | <!--T:55--> | ||
<syntaxhighlight lang="bash"> | <syntaxhighlight lang="bash"> | ||
core@CoreOSnode-2 ~ $ sudo rm -f /etc/machine-id | core@CoreOSnode-2 ~ $ sudo rm -f /etc/machine-id | ||
| Ligne 399 : | Ligne 463 : | ||
| + | <!--T:56--> | ||
<syntaxhighlight lang="bash"> | <syntaxhighlight lang="bash"> | ||
core@CoreOSnode-3 ~ $ sudo rm -f /etc/machine-id | core@CoreOSnode-3 ~ $ sudo rm -f /etc/machine-id | ||
| Ligne 405 : | Ligne 470 : | ||
| − | Une fois redémarrées, vos 2 autres instances ont normalement rejoint votre cluster CoreOS/Etcd/Fleet : | + | <!--T:57--> |
| + | Une fois redémarrées, vos 2 autres instances ont normalement rejoint votre <span class="notranslate">cluster</span> CoreOS/Etcd/Fleet : | ||
| + | <!--T:58--> | ||
<syntaxhighlight lang="bash"> | <syntaxhighlight lang="bash"> | ||
core@CoreOSnode-1 ~ $ fleetctl list-machines | core@CoreOSnode-1 ~ $ fleetctl list-machines | ||
| Ligne 417 : | Ligne 484 : | ||
| − | Si vos instances n'ont pas rejoint le cluster, pensez à vérifier que vos instances peuvent bien communiquer entre elles (connexions réseaux, règles parefeu/security group) | + | <!--T:59--> |
| + | Si vos instances n'ont pas rejoint le <span class="notranslate">cluster</span>, pensez à vérifier que vos instances peuvent bien communiquer entre elles (connexions réseaux, règles parefeu/security group) | ||
| − | Maintenant que nous avons un cluster CoreOS/etcd/fleet de 3 instances, nous allons installer le panamax-remote-agent ainsi que le panamax-adapter : | + | <!--T:60--> |
| + | Maintenant que nous avons un <span class="notranslate">cluster</span> CoreOS/etcd/fleet de 3 instances, nous allons installer le <span class="notranslate">panamax-remote-agent</span> ainsi que le <span class="notranslate">panamax-adapter</span> : | ||
| + | <!--T:61--> | ||
On exécute le script d'installation de l'agent Panamax : | On exécute le script d'installation de l'agent Panamax : | ||
| + | <!--T:62--> | ||
<syntaxhighlight lang="bash"> | <syntaxhighlight lang="bash"> | ||
core@CoreOSnode-1 ~ $ sudo bash -c "$(curl http://download.panamax.io/agent/pmx-agent-install)" | core@CoreOSnode-1 ~ $ sudo bash -c "$(curl http://download.panamax.io/agent/pmx-agent-install)" | ||
| Ligne 444 : | Ligne 515 : | ||
| + | <!--T:63--> | ||
Puis | Puis | ||
| + | <!--T:64--> | ||
<syntaxhighlight lang="bash"> | <syntaxhighlight lang="bash"> | ||
core@CoreOSnode-1 ~ $ sudo bash -c "$(curl http://download.panamax.io/agent/pmx-agent-install)" | core@CoreOSnode-1 ~ $ sudo bash -c "$(curl http://download.panamax.io/agent/pmx-agent-install)" | ||
| Ligne 465 : | Ligne 538 : | ||
CoreOSnode-1 core # cd /root/pmx-agent | CoreOSnode-1 core # cd /root/pmx-agent | ||
| + | <!--T:65--> | ||
███████╗ ██████╗ █████████╗ ██████╗ ██████████╗ ██████╗ ██╗ ██╗ | ███████╗ ██████╗ █████████╗ ██████╗ ██████████╗ ██████╗ ██╗ ██╗ | ||
██╔══██║ ╚═══██╗ ███╗ ███║ ╚═══██╗ ██║ ██╔ ██║ ╚═══██╗ ╚██╗██╔╝ | ██╔══██║ ╚═══██╗ ███╗ ███║ ╚═══██╗ ██║ ██╔ ██║ ╚═══██╗ ╚██╗██╔╝ | ||
| Ligne 472 : | Ligne 546 : | ||
╚═╝ ╚══════╝ ╚══╝ ╚══╝ ╚══════╝ ╚═╝ ╚═╝ ╚═╝ ╚══════╝ ╚═╝ ╚═╝ | ╚═╝ ╚══════╝ ╚══╝ ╚══╝ ╚══════╝ ╚═╝ ╚═╝ ╚═╝ ╚══════╝ ╚═╝ ╚═╝ | ||
| − | CenturyLink Labs - http://www.centurylinklabs.com/ | + | <!--T:66--> |
| + | <span class="notranslate">CenturyLink Labs</span> - http://www.centurylinklabs.com/ | ||
| − | 1) init: First time installing Panamax Remote Agent! - Downloads and installs Panamax Remote Agent. | + | <!--T:67--> |
| + | 1) init: First time installing Panamax Remote Agent! - Downloads and installs Panamax Remote Agent. | ||
2) restart: Stops and Starts Panamax Remote Agent and Adapter. | 2) restart: Stops and Starts Panamax Remote Agent and Adapter. | ||
3) reinstall: Deletes your current Panamax Remote Agent and Adapter and reinstalls latest version. | 3) reinstall: Deletes your current Panamax Remote Agent and Adapter and reinstalls latest version. | ||
| Ligne 488 : | Ligne 564 : | ||
| − | Tapez 1 pour installer le Panamax Remote Agent : | + | <!--T:68--> |
| + | Tapez 1 pour installer le <span class="notranslate">Panamax Remote Agent</span> : | ||
| + | <!--T:69--> | ||
<syntaxhighlight lang="bash"> | <syntaxhighlight lang="bash"> | ||
Please select one of the preceding options: 1 | Please select one of the preceding options: 1 | ||
| + | <!--T:70--> | ||
Installing panamax remote agent/adapter... | Installing panamax remote agent/adapter... | ||
| + | <!--T:71--> | ||
Installing Panamax adapter: | Installing Panamax adapter: | ||
| + | <!--T:72--> | ||
Select the ochestrator you want to use: | Select the ochestrator you want to use: | ||
| + | <!--T:73--> | ||
1) Kubernetes | 1) Kubernetes | ||
2) CoreOS Fleet | 2) CoreOS Fleet | ||
| Ligne 507 : | Ligne 589 : | ||
| − | Choisissez l'orchestrateur "2) CoreOS Fleet" et indiquez votre ip : | + | <!--T:74--> |
| + | Choisissez l'orchestrateur "2) <span class="notranslate">CoreOS Fleet"</span> et indiquez votre ip : | ||
| + | <!--T:75--> | ||
<syntaxhighlight lang="bash"> | <syntaxhighlight lang="bash"> | ||
Please select one of the preceding options: 2 | Please select one of the preceding options: 2 | ||
| − | Enter the API endpoint to access the Fleet cluster (e.g: http://10.187.241.100:4001): http://178.170.XX.XXX:4001 | + | <!--T:76--> |
| + | Enter the API endpoint to access the Fleet <span class="notranslate">cluster</span> (e.g: http://10.187.241.100:4001): http://178.170.XX.XXX:4001 | ||
| + | <!--T:77--> | ||
Starting Panamax Fleet adapter: | Starting Panamax Fleet adapter: | ||
| + | <!--T:78--> | ||
docker pull centurylink/panamax-fleet-adapter:latest | docker pull centurylink/panamax-fleet-adapter:latest | ||
| + | <!--T:79--> | ||
56b22791d9b3dac06e2348a6a867527ffae01a37ab374159be48bbafaf77334f | 56b22791d9b3dac06e2348a6a867527ffae01a37ab374159be48bbafaf77334f | ||
| + | <!--T:80--> | ||
Installing Panamax remote agent: | Installing Panamax remote agent: | ||
Enter the public hostname (dev.example.com, without 'http') or IP Address (ex: 206.x.x.x) of the agent: Enter the public hostname (dev.example.com, without 'http') or IP Address (ex: 206.x.x.x) of the agent: 178.170.XX.XXX | Enter the public hostname (dev.example.com, without 'http') or IP Address (ex: 206.x.x.x) of the agent: Enter the public hostname (dev.example.com, without 'http') or IP Address (ex: 206.x.x.x) of the agent: 178.170.XX.XXX | ||
Enter the port to run the agent on (3001): | Enter the port to run the agent on (3001): | ||
| + | <!--T:81--> | ||
Generating SSL Key | Generating SSL Key | ||
| + | <!--T:82--> | ||
docker pull centurylink/openssl:latest | docker pull centurylink/openssl:latest | ||
| + | <!--T:83--> | ||
Generating RSA private key, 1024 bit long modulus | Generating RSA private key, 1024 bit long modulus | ||
......++++++ | ......++++++ | ||
| Ligne 547 : | Ligne 639 : | ||
Getting Private key | Getting Private key | ||
| + | <!--T:84--> | ||
Starting Panamax remote agent: | Starting Panamax remote agent: | ||
| + | <!--T:85--> | ||
docker pull centurylink/panamax-remote-agent:latest | docker pull centurylink/panamax-remote-agent:latest | ||
| + | <!--T:86--> | ||
524bc3b7db813d2f20f8dc028037ce8f42ecfc05ebe8c4f67a172e3f6125dc44 | 524bc3b7db813d2f20f8dc028037ce8f42ecfc05ebe8c4f67a172e3f6125dc44 | ||
| − | ============================== START ============================== | + | ============================== START ============================== <!--T:87--> |
aHR0cHM6Ly8xNzguMTcwLjY4LjE1NzozMDAxfDdiYzExYjNiLTMxZDEtNGM1NS1hZWNlLWFmNTRk | aHR0cHM6Ly8xNzguMTcwLjY4LjE1NzozMDAxfDdiYzExYjNiLTMxZDEtNGM1NS1hZWNlLWFmNTRk | ||
NGQ1NzkzNHxOVGs1TUdNMk5tVXRNV0UzWlMwME1EUmhMVGc1T0RNdFpqZGhZVEJqWTJVM1ptSm1D | NGQ1NzkzNHxOVGs1TUdNMk5tVXRNV0UzWlMwME1EUmhMVGc1T0RNdFpqZGhZVEJqWTJVM1ptSm1D | ||
| Ligne 590 : | Ligne 685 : | ||
| + | <!--T:88--> | ||
Copy and paste the above (Not including start/end tags) to your local panamax client to connect to this remote agent. | Copy and paste the above (Not including start/end tags) to your local panamax client to connect to this remote agent. | ||
| + | <!--T:89--> | ||
Remote Agent/Adapter installation complete! | Remote Agent/Adapter installation complete! | ||
| + | <!--T:90--> | ||
CoreOSnode-1 pmx-agent # | CoreOSnode-1 pmx-agent # | ||
</syntaxhighlight> | </syntaxhighlight> | ||
| − | Comme cela est indiqué en fin d'installation, vous devez copier-coller (sans les lignes balises START/END) la clé privée de votre panamax remote agent dans l'UI Panamax lors de la création de votre Panamax Remote Deployment Target. | + | <!--T:91--> |
| + | Comme cela est indiqué en fin d'installation, vous devez copier-coller (sans les lignes balises START/END) la clé privée de votre panamax remote agent dans l'UI Panamax lors de la création de votre <span class="notranslate">Panamax Remote Deployment Target</span>. | ||
| − | == | + | ==Ajouter votre <span class="notranslate">Panamax Remote Deployment Target</span> à votre Panamax UI== <!--T:92--> |
| − | Pour ajouter votre Panamax Remote Deployment Target dans votre Panamax UI, connectez-vous à celle-ci via votre navigateur : | + | <!--T:93--> |
| + | Pour ajouter votre <span class="notranslate">Panamax Remote Deployment Target</span> dans votre Panamax UI, connectez-vous à celle-ci via votre navigateur : | ||
| − | - allez dans "MANAGE" | + | <!--T:94--> |
| + | - allez dans <span class="notranslate">"MANAGE"</span> | ||
| + | <!--T:95--> | ||
[[File:Panamax-ui-manage.png]] | [[File:Panamax-ui-manage.png]] | ||
| + | <!--T:96--> | ||
- cliquez sur le nom d'un template peu importe lequel pour le moment (ex: "Wordpress with MySQL") | - cliquez sur le nom d'un template peu importe lequel pour le moment (ex: "Wordpress with MySQL") | ||
| + | <!--T:97--> | ||
[[File:Panamax-ui-search-tmplt.png]] | [[File:Panamax-ui-search-tmplt.png]] | ||
| − | - cliquez sur le bouton "Run Template" | + | <!--T:98--> |
| + | - cliquez sur le bouton <span class="notranslate">"Run Template" </span> | ||
| + | <!--T:99--> | ||
[[File:Panamax-ui-fleche.png]] | [[File:Panamax-ui-fleche.png]] | ||
| − | - cliquez sur "Deploy to Target" : | + | <!--T:100--> |
| + | - cliquez sur <span class="notranslate">"Deploy to Target"</span> : | ||
| + | <!--T:101--> | ||
[[File:Panamax-ui-deploytotarget.png]] | [[File:Panamax-ui-deploytotarget.png]] | ||
| − | - Cliquez sur "Add a New Remote Deployment Target" | + | <!--T:102--> |
| + | - Cliquez sur <span class="notranslate">"Add a New Remote Deployment Target"</span> | ||
| + | <!--T:103--> | ||
[[File:Panamax-ui-remotedeploymenttarget.png]] | [[File:Panamax-ui-remotedeploymenttarget.png]] | ||
| − | - Cliquez sur "Enter your token here." (en bas à droite de la page) | + | <!--T:104--> |
| + | - Cliquez sur <span class="notranslate">"Enter your token here."</span> (en bas à droite de la page) | ||
| + | <!--T:105--> | ||
[[File:Panamax-ui-entertokens.png]] | [[File:Panamax-ui-entertokens.png]] | ||
| − | - Saisissez l'adresse ip de votre Panamax Remote Agent (que vous avez paramétré lors de son installation dans le champs "Name") puis copiez-collez la clé privé de l'agent retournée à la fin de l'installation du Panamax Remote Agent (sans les lignes | + | <!--T:106--> |
| + | - Saisissez l'adresse ip de votre <span class="notranslate">Panamax Remote Agent </span>(que vous avez paramétré lors de son installation dans le champs <span class="notranslate">"Name"</span>) puis copiez-collez la clé privé de l'agent retournée à la fin de l'installation du <span class="notranslate">Panamax Remote Agent</span> (sans les lignes balises <span class="notranslate">START/END</span>). | ||
| + | <!--T:107--> | ||
[[File:Panamax-ui-tokens.png]] | [[File:Panamax-ui-tokens.png]] | ||
| − | - Cliquez sur "Save Remote Deployment Target" | + | <!--T:108--> |
| + | - Cliquez sur <span class="notranslate">"Save Remote Deployment Target"</span> | ||
| + | <!--T:109--> | ||
Vous devriez avoir le résultat suivant : | Vous devriez avoir le résultat suivant : | ||
| + | <!--T:110--> | ||
[[File:Panamax-ui-remotedeploytarget-added.png]] | [[File:Panamax-ui-remotedeploytarget-added.png]] | ||
| − | - Cliquez sur la flèche verte à gauche du nom de votre Remote Deployment Target puis forcer une première mise à jour : | + | <!--T:111--> |
| + | - Cliquez sur la flèche verte à gauche du nom de votre<span class="notranslate"> Remote Deployment Target</span> puis forcer une première mise à jour : | ||
| + | <!--T:112--> | ||
[[File:Panamax-ui-remotedeploymenttarget-update.png]] | [[File:Panamax-ui-remotedeploymenttarget-update.png]] | ||
| − | Après mise à jour, les informations sur votre Remote Deployment Targets telles que la version de votre Panamax Remote Agent, le type de votre Panamax Adapter et sa version : | + | <!--T:113--> |
| + | Après mise à jour, les informations sur votre <span class="notranslate">Remote Deployment Targets</span> telles que la version de votre <span class="notranslate">Panamax Remote Agent</span>, le type de votre <span class="notranslate">Panamax Adapter</span> et sa version : | ||
| + | <!--T:114--> | ||
[[File:Panamax-ui-remotedeploymenttarget-informations.png]] | [[File:Panamax-ui-remotedeploymenttarget-informations.png]] | ||
| + | ==Déploiement d'une application via Panamax UI== <!--T:115--> | ||
| − | + | <!--T:116--> | |
| − | + | Il vous est maintenant possible de déployer une application disponible dans la market place <span class="notranslate">"Panamax Templates & Docker Repositories"</span> depuis votre Panamax UI sur votre <span class="notranslate">Panamax Remote Deployment Target</span> : | |
| − | |||
| − | Il vous est maintenant possible de déployer une application disponible dans la market place "Panamax Templates & Docker Repositories" depuis votre Panamax UI sur votre Panamax Remote Deployment Target : | ||
| − | - Recherchez le nom de l'application que vous souhaitez déployer. Nous choisissons le template Century Link "Wordpress with MySQL" | + | <!--T:117--> |
| + | - Recherchez le nom de l'application que vous souhaitez déployer. Nous choisissons le template <span class="notranslate">Century Link "Wordpress with MySQL"</span> | ||
| + | <!--T:118--> | ||
- Vous pouvez cliquez sur "More Details" pour avoir plus d'informations sur le template que vous avez choisis. Vous pouvez également voir de combien d'image(s) Docker le template est constitué (dans notre cas 2 images) | - Vous pouvez cliquez sur "More Details" pour avoir plus d'informations sur le template que vous avez choisis. Vous pouvez également voir de combien d'image(s) Docker le template est constitué (dans notre cas 2 images) | ||
| + | <!--T:119--> | ||
[[File:Panamax-ui-template-details.png]] | [[File:Panamax-ui-template-details.png]] | ||
| − | - Cliquez sur "Run Template" pour déployer le menu et cliquez sur "Deploy to Target" : | + | <!--T:120--> |
| + | - Cliquez sur <span class="notranslate">"Run Template" pour déployer le menu et cliquez sur "Deploy to Target"</span> : | ||
| + | <!--T:121--> | ||
[[File:Panamax-ui-deploytotarget-wordpress.png]] | [[File:Panamax-ui-deploytotarget-wordpress.png]] | ||
| − | - Cliquez sur "Select this Target" pour sélectionner votre Remote Deployment Target | + | <!--T:122--> |
| + | - Cliquez sur <span class="notranslate">"Select this Target"</span> pour sélectionner votre <span class="notranslate">Remote Deployment Target</span> | ||
| + | <!--T:123--> | ||
[[File:Panamax-ui-select-target.png]] | [[File:Panamax-ui-select-target.png]] | ||
| − | - Renseignez les éventuels champs de "Deployment Settings" de l'application que vous déployée (mot de passe, variables d'environnement,etc.) puis cliquez sur le bouton "Deploy to Target" en dessous pour valider | + | <!--T:124--> |
| + | - Renseignez les éventuels champs de <span class="notranslate">"Deployment Settings"</span> de l'application que vous déployée (mot de passe, variables d'environnement,etc.) puis cliquez sur le bouton <span class="notranslate">"Deploy to Target"</span> en dessous pour valider | ||
| + | <!--T:125--> | ||
[[File:Panamax-ui-deployment-settings.png]] | [[File:Panamax-ui-deployment-settings.png]] | ||
| + | <!--T:126--> | ||
- Vous devriez avoir le résultat suivant : | - Vous devriez avoir le résultat suivant : | ||
| + | <!--T:127--> | ||
[[File:Panamax-ui-deployment-triggered.png]] | [[File:Panamax-ui-deployment-triggered.png]] | ||
| − | Si vous vous connectez à vos instances de votre cluster CoreOS, vous pourrez voir que Panamax a réparti les containers Docker sur différents nodes/instances de votre cluster CoreOS : | + | <!--T:128--> |
| + | Si vous vous connectez à vos instances de votre <span class="notranslate">cluster</span> CoreOS, vous pourrez voir que Panamax a réparti les containers Docker sur différents nodes/instances de votre <span class="notranslate">cluster</span> CoreOS : | ||
| − | - On peut voir que l'image centurylink/wordpress a été déployée sur notre première instance CoreOS : | + | <!--T:129--> |
| + | - On peut voir que l'image <span class="notranslate">centurylink/wordpress</span> a été déployée sur notre première instance CoreOS : | ||
| + | <!--T:130--> | ||
<syntaxhighlight lang="bash"> | <syntaxhighlight lang="bash"> | ||
core@CoreOSnode-1 ~ $ docker ps | core@CoreOSnode-1 ~ $ docker ps | ||
| Ligne 727 : | Ligne 861 : | ||
| − | - Et l'image centurylink/mysql sur notre troisième instance de notre cluster : | + | <!--T:131--> |
| + | - Et l'image <span class="notranslate">centurylink/mysql</span> sur notre troisième instance de notre <span class="notranslate">cluster</span> : | ||
| + | <!--T:132--> | ||
<syntaxhighlight lang="bash"> | <syntaxhighlight lang="bash"> | ||
core@CoreOSnode-3 ~ $ docker ps | core@CoreOSnode-3 ~ $ docker ps | ||
| Ligne 737 : | Ligne 873 : | ||
| − | - Nous pouvons également avoir certaines informations relatives aux déploiements des applications effectués via Panamax UI par l'intermédiaire de notre gestionnaire de cluster Etcd : | + | <!--T:133--> |
| + | - Nous pouvons également avoir certaines informations relatives aux déploiements des applications effectués via Panamax UI par l'intermédiaire de notre gestionnaire de <span class="notranslate">cluster</span> Etcd : | ||
| − | On retrouve nos 2 applications (Wordpress "WP" et MySQL "DB") : | + | <!--T:134--> |
| + | On retrouve nos 2 applications<span class="notranslate"> (Wordpress "WP" et MySQL "DB")</span> : | ||
| + | <!--T:135--> | ||
<syntaxhighlight lang="bash"> | <syntaxhighlight lang="bash"> | ||
core@CoreOSnode-1 ~ $ etcdctl ls --recursive /app | core@CoreOSnode-1 ~ $ etcdctl ls --recursive /app | ||
| Ligne 752 : | Ligne 891 : | ||
| − | On peut également voir sur quel instance membre de notre cluster l'application a été déployée : | + | <!--T:136--> |
| + | On peut également voir sur quel instance membre de notre <span class="notranslate">cluster</span> l'application a été déployée : | ||
| + | <!--T:137--> | ||
<syntaxhighlight lang="bash"> | <syntaxhighlight lang="bash"> | ||
core@CoreOSnode-1 ~ $ etcdctl get /app/DB/DB_SERVICE_HOST | core@CoreOSnode-1 ~ $ etcdctl get /app/DB/DB_SERVICE_HOST | ||
| Ligne 761 : | Ligne 902 : | ||
| + | <!--T:138--> | ||
<syntaxhighlight lang="bash"> | <syntaxhighlight lang="bash"> | ||
core@CoreOSnode-1 ~ $ etcdctl get /app/WP/WP_SERVICE_HOST | core@CoreOSnode-1 ~ $ etcdctl get /app/WP/WP_SERVICE_HOST | ||
| Ligne 767 : | Ligne 909 : | ||
| − | - Nous pouvons aussi avoir le statut des applications de notre cluster par Fleet qui le gestionnaire des applications dans notre cluster : | + | <!--T:139--> |
| + | - Nous pouvons aussi avoir le statut des applications de notre cluster par <span class="notranslate">Fleet</span> qui le gestionnaire des applications dans notre <span class="notranslate">cluster</span> : | ||
| + | <!--T:140--> | ||
<syntaxhighlight lang="bash"> | <syntaxhighlight lang="bash"> | ||
core@CoreOSnode-1 ~ $ fleetctl list-unit-files | core@CoreOSnode-1 ~ $ fleetctl list-unit-files | ||
| Ligne 778 : | Ligne 922 : | ||
| − | - Nous pouvons vérifier le bon fonctionnement de notre Wordpress en y accédant avec les informations fournis dans les détails du template (dans notre cas sur le port 8080 ouvert au niveau du parefeu préalablement) : | + | <!--T:141--> |
| + | - Nous pouvons vérifier le bon fonctionnement de notre <span class="notranslate">Wordpress</span> en y accédant avec les informations fournis dans les détails du template (dans notre cas sur le port 8080 ouvert au niveau du parefeu préalablement, nous aurions pu faire une redirection de port du 8080 sur le port 80 public dans le cas d'instances en zone avancée) : | ||
| + | <!--T:142--> | ||
[[File:Panamax-application-wordpress.png]] | [[File:Panamax-application-wordpress.png]] | ||
| + | |||
| + | <!--T:143--> | ||
| + | Cet article vous a semblé utile ? <vote /> | ||
| + | |||
[[category:cloudstack]] | [[category:cloudstack]] | ||
[[category:cloud public]] | [[category:cloud public]] | ||
[[category:cloud privé]] | [[category:cloud privé]] | ||
| + | [[category:Docker]] | ||
| + | [[category:CoreOS]] | ||
| + | [[category:Cloud]] | ||
| + | <br /> | ||
| + | <comments /> | ||
Version actuelle datée du 21 septembre 2021 à 10:04
fr:Utiliser Panamax sur Cloudstack by Ikoula he:השתמש Cloudstack על ידי Ikoula פנמקס ro:Utilizarea Cloudstack de Ikoula Panamax ru:Использование Cloudstack по Ikoula Panamax pl:Użyj Cloudstack przez Ikoula Panamax ja:Ikoula パナマックスで Cloudstack を使用します。 ar:استخدام كلودستاك ببنما عكلة zh:使用由 Ikoula 巴拿马 Cloudstack de:Verwenden von Cloudstack von Ikoula Panamax nl:Cloudstack door Ikoula Panamax gebruiken it:Utilizzare Cloudstack da Ikoula Panamax pt:Usar o Cloudstack por Ikoula Panamax es:Uso de Cloudstack por Ikoula Panamax en:Use Cloudstack by Ikoula Panamax
Si vous ne connaissez pas encore Panamax il s'agit d'un produit Open Source développé par Century Link Labs qui est à la fois une market place et un gestionnaire pour applications conteneurisées Docker depuis une interface web intuitive.
Il suffit en effet de chercher l'application de notre choix puis d'un clique pour la déployer sur nos instances cibles à l'aide de docker et d'un agent Panamax.
Panamax s'appuie sur les technologies Docker, Etcd, Fleet et Cloud-init incluses dans CoreOS.
Nous utiliserons dans notre exemple 4 instances CoreOS à jour, une pour la partie cliente/Panamax UI et les 3 autres qui formeront le cluster pour la partie Panamax Remote Target (Panamax Remote Agent + Panamax Adapter) :
Installation de Panamax UI/API (interface web/market place)
Sur notre instance dédiée à la partie cliente de Panamax (Panamax UI/API), on télécharge l'archive comprenant l'installateur :
core@CoreOS-PanamaxUI ~ $ sudo curl -O http://download.panamax.io/installer/panamax-latest.tar.gz
  % Total    % Received % Xferd  Average Speed   Time    Time     Time  Current
                                 Dload  Upload   Total   Spent    Left  Speed
100 15165  100 15165    0     0  22157      0 --:--:-- --:--:-- --:--:-- 49558
On crée le répertoire /var/panamax dans lequel on extrait les fichiers d'installation :
core@CoreOS-PanamaxUI ~ $ sudo mkdir -p /var/panamax
core@CoreOS-PanamaxUI ~ $ sudo tar -C /var/panamax -zxvf panamax-latest.tar.gz
./
./Makefile
./configure
./create-docker-mount
./LICENSE
./desktop
./panamax
./.coreosenv
./README.md
./CHANGELOG.md
./ubuntu.sh
./Vagrantfile
./.version
./coreos
./Vagrantfile-win
./CONTRIBUTING.md
On se place dans le répertoire /var/panamax et on lance l'installateur spécifique à CoreOS en précisant qu'on veut utiliser la version stable (sortie tronquée volontairement) :
core@CoreOS-PanamaxUI ~ $ cd /var/panamax
core@CoreOS-PanamaxUI /var/panamax $ sudo ./coreos install --stable
Installing Panamax...
Created symlink from /etc/systemd/system/update-engine-reboot-manager.service to /dev/null.
Created symlink from /etc/systemd/system/update-engine.service to /dev/null.
Created symlink from /etc/systemd/system/sockets.target.wants/systemd-journal-gatewayd.socket to /usr/lib64/systemd/system/systemd-

<!--T:12-->
docker pull centurylink/panamax-api:latest
.................
docker pull centurylink/panamax-ui:latest
.....
docker pull google/cadvisor:0.13.0
.........
docker pull centurylink/redis:latest
....
docker pull centurylink/dray:latest
...Created symlink from /etc/systemd/system/multi-user.target.wants/panamax-redis.service to /etc/systemd/system/panamax-redis.serv
Created symlink from /etc/systemd/system/multi-user.target.wants/panamax-dray.service to /etc/systemd/system/panamax-dray.service.
Created symlink from /etc/systemd/system/multi-user.target.wants/panamax-metrics.service to /etc/systemd/system/panamax-metrics.ser
Created symlink from /etc/systemd/system/multi-user.target.wants/panamax-api.service to /etc/systemd/system/panamax-api.service.
Created symlink from /etc/systemd/system/multi-user.target.wants/panamax-ui.service to /etc/systemd/system/panamax-ui.service.
...
Jul 10 11:45:39 CoreOS-PanamaxUI docker[1790]: => Rails 4.1.7 application starting in production on http://0.0.0.0:3000
Jul 10 11:45:39 CoreOS-PanamaxUI docker[1790]: => Run `rails server -h` for more startup options
Jul 10 11:45:39 CoreOS-PanamaxUI docker[1790]: => Notice: server is listening on all interfaces (0.0.0.0). Consider using 127.0.0.1 (--binding option)
Jul 10 11:45:39 CoreOS-PanamaxUI docker[1790]: => Ctrl-C to shutdown server
Panamax install complete
core@CoreOS-PanamaxUI /var/panamax $
Nous pouvons vérifier que nos 5 containers Panamax sont bien en cours d'exécution :
core@CoreOS-PanamaxUI /var/panamax $ docker ps
CONTAINER ID        IMAGE                            COMMAND                CREATED             STATUS              PORTS                    NAMES
41a18b410427        centurylink/panamax-ui:latest    "/bin/sh -c 'bundle    3 minutes ago       Up 3 minutes        0.0.0.0:3000->3000/tcp   PMX_UI
0cc8befee1b7        centurylink/panamax-api:latest   "/bin/sh -c 'bundle    3 minutes ago       Up 3 minutes        0.0.0.0:3001->3000/tcp   PMX_API
0929e65f6d55        google/cadvisor:0.13.0           "/usr/bin/cadvisor"    3 minutes ago       Up 3 minutes        0.0.0.0:3002->8080/tcp   PMX_CADVISOR
06b2219ac42e        centurylink/dray:0.10.0          "/dray"                3 minutes ago       Up 3 minutes        0.0.0.0:3003->3000/tcp   PMX_DRAY
8a6110651dcc        centurylink/redis:latest         "redis-server"         3 minutes ago       Up 3 minutes        6379/tcp                 PMX_DRAY_REDIS
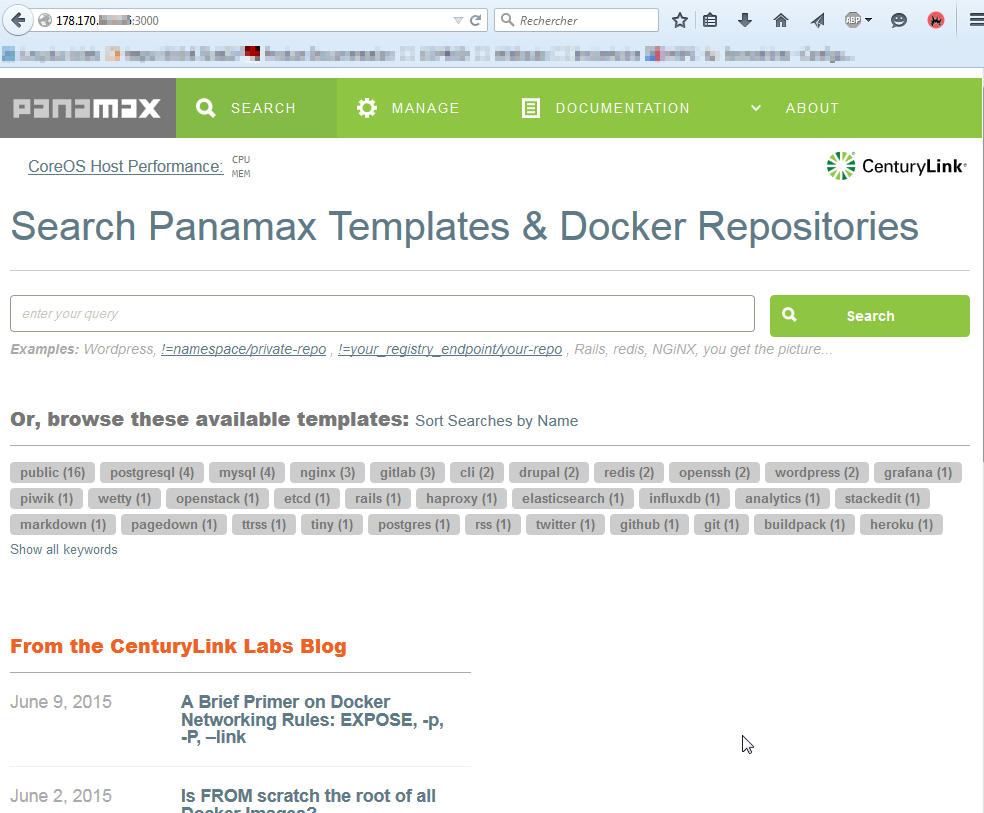
Nous pouvons nous connecter à notre UI Panamax à l'aide de notre navigateur en tappant l'ip de notre instance suivit de ":3000" pour préciser le port d'écoute (n'oubliez pas de créer des règles d'autorisations parefeu et une redirection de port si besoin) de celle-ci :
Installation de Panamax Remote Deployment Target
Connectez-vous à l'une de vos 3 instances CoreOS déployées pour le cluster :
Générer une nouvelle URL de discovery Etcd (tokens) dans une variable (ici: ETCD_URL) :
core@CoreOSnode-1 ~ $ ETCD_URL=$(curl http://discovery.etcd.io/new)
  % Total    % Received % Xferd  Average Speed   Time    Time     Time  Current
                                 Dload  Upload   Total   Spent    Left  Speed
100    58  100    58    0     0     79      0 --:--:-- --:--:-- --:--:--   101
core@CoreOSnode-1 ~ $ echo $ETCD_URL
https://discovery.etcd.io/b8069c9bd67eae5cf19689daf4ebdd66
Puis téléchargez le fichier cloud-config.yml template suivant :
core@CoreOSnode-1 ~ $ sudo wget -NP /usr/share/oem/ http://mirror02.ikoula.com/priv/coreos/cloud-config.yml
--2015-06-16 15:37:53--  http://mirror02.ikoula.com/priv/coreos/cloud-config.yml
Resolving mirror02.ikoula.com... 80.93.XX.XXX, 2a00:c70:1:80:93:XX:XXX:1
Connecting to mirror02.ikoula.com|80.93.XX.XXX|:80... connected.
HTTP request sent, awaiting response... 200 OK
Length: 1542 (1.5K) [text/plain]
Remote file is newer, retrieving.

<!--T:23-->
--2015-06-16 15:37:53--  http://mirror02.ikoula.com/priv/coreos/cloud-config.yml
Reusing existing connection to mirror02.ikoula.com:80.
HTTP request sent, awaiting response... 200 OK
Length: 1542 (1.5K) [text/plain]
Saving to: '/usr/share/oem/cloud-config.yml'

<!--T:24-->
/usr/share/oem/cloud-config.yml               100%[===================================================================================================>]   1.51K  --.-KB/s   in 0s

<!--T:25-->
2015-06-16 15:37:53 (264 MB/s) - '/usr/share/oem/cloud-config.yml' saved [1542/1542]
core@CoreOSnode-1 ~ $ export `cat /etc/environment`
Exécutez les commandes suivantes pour personnaliser le fichier cloud-config.yml téléchargé avec les valeurs propres à votre environnement :
core@CoreOSnode-1 ~ $ sudo sed -i 's#DISCOVERY_URL#'$ETCD_URL'#g' /usr/share/oem/cloud-config.yml
core@CoreOSnode-1 ~ $ sudo sed -i 's#PRIVATE_IP#'$COREOS_PRIVATE_IPV4'#g' /usr/share/oem/cloud-config.yml
On vérifie que nos paramètres Etcd et Fleet on bien été substitués :
core@CoreOSnode-1 ~ $ cat /usr/share/oem/cloud-config.yml
#cloud-config

<!--T:31-->
coreos:
    units:
      - name: cloudstack-ssh-key.service
        command: restart
        runtime: yes
        content: |
          [Unit]
          Description=Sets SSH key from metadata

          <!--T:32-->
[Service]
          Type=oneshot
          StandardOutput=journal+console
          ExecStart=/usr/share/oem/bin/cloudstack-ssh-key
      - name: cloudstack-hostname.service
        command: restart
        runtime: yes
        content: |
          [Unit]
          Description=Sets hostname from metadata

          <!--T:33-->
[Service]
          Type=oneshot
          StandardOutput=journal+console
          ExecStart=/usr/share/oem/bin/cloudstack-hostname
      - name: cloudstack-cloudinit.service
        command: restart
        runtime: yes
        content: |
          [Unit]
          Description=Cloudinit from CloudStack-style metadata
          Requires=coreos-setup-environment.service
          After=coreos-setup-environment.service

          <!--T:34-->
[Service]
          Type=oneshot
          EnvironmentFile=/etc/environment
          ExecStart=/usr/share/oem/bin/cloudstack-coreos-cloudinit
      - name: etcd.service
        command: start
      - name: fleet.service
        command: start
    oem:
      id: cloudstack
      name: CloudStack
      version-id: 0.0.1-r3
      home-url: http://cloudstack.apache.org/
      bug-report-url: https://github.com/coreos/coreos-overlay
    etcd:
      discovery: https://discovery.etcd.io/b8069c9bd67eae5cf19689daf4ebdd66
      addr: 178.170.XX.XXX:4001
      peer-addr: 178.170.XX.XXX:7001
    fleet:
      public-ip: 178.170.XX.XXX
Supprimez le fichier /etc/machine-id puis rebootez l'instance afin de regénérer un nouvel id de machine (vos 3 instances devront avoir un id différent) :
core@CoreOSnode-1 ~ $ sudo rm -f /etc/machine-id
core@CoreOSnode-1 ~ $ sudo reboot
Votre première instance devrait apparaître dans la liste des machines gérées dans Fleet :
core@CoreOSnode-1 ~ $ fleetctl list-machines
MACHINE         IP              METADATA
7e685988...     178.170.XX.XXX  -
Ici nous voyons bien notre première instance dans la liste des machines Fleet, ce sera donc notre instance qui initialisera notre cluster CoreOS/Etcd/Fleet.
Configurez maintenant vos deux autres instances CoreOS remote deployment target en suivant les instructions ci-dessous :
Connectez-vous à vos deux autres instances puis recopiez le contenu du fichier /usr/share/oem/cloud-config.yml de votre première instance en remplaçant uniquement l'ip de celle-ci par l'ip de votre seconde instance sur votre seconde instance et par l'ip de votre troisième instance sur votre troisième instance (vous devrez passer root via un "sudo su") :
Sur notre seconde instance (adresse ip 178.170.XX.YYY) le fichier /usr/share/oem/cloud-config.yml aura donc le contenu suivant (identique sauf l'adresse ip) :
core@CoreOSnode-2 ~ $ cat /usr/share/oem/cloud-config.yml
#cloud-config

<!--T:44-->
coreos:
    units:
      - name: cloudstack-ssh-key.service
        command: restart
        runtime: yes
        content: |
          [Unit]
          Description=Sets SSH key from metadata

          <!--T:45-->
[Service]
          Type=oneshot
          StandardOutput=journal+console
          ExecStart=/usr/share/oem/bin/cloudstack-ssh-key
      - name: cloudstack-hostname.service
        command: restart
        runtime: yes
        content: |
          [Unit]
          Description=Sets hostname from metadata

          <!--T:46-->
[Service]
          Type=oneshot
          StandardOutput=journal+console
          ExecStart=/usr/share/oem/bin/cloudstack-hostname
      - name: cloudstack-cloudinit.service
        command: restart
        runtime: yes
        content: |
          [Unit]
          Description=Cloudinit from CloudStack-style metadata
          Requires=coreos-setup-environment.service
          After=coreos-setup-environment.service

          <!--T:47-->
[Service]
          Type=oneshot
          EnvironmentFile=/etc/environment
          ExecStart=/usr/share/oem/bin/cloudstack-coreos-cloudinit
      - name: etcd.service
        command: start
      - name: fleet.service
        command: start
    oem:
      id: cloudstack
      name: CloudStack
      version-id: 0.0.1-r3
      home-url: http://cloudstack.apache.org/
      bug-report-url: https://github.com/coreos/coreos-overlay
    etcd:
      discovery: https://discovery.etcd.io/b8069c9bd67eae5cf19689daf4ebdd66
      addr: 178.170.XX.YYY:4001
      peer-addr: 178.170.XX.YYY:7001
    fleet:
      public-ip: 178.170.XX.YYY
Sur notre troisième instance (adresse ip 178.170.XX.ZZZ) le fichier /usr/share/oem/cloud-config.yml aura donc le contenu suivant (identique aux 2 autres sauf l'adresse ip) :
core@CoreOSnode-3 ~ $ cat /usr/share/oem/cloud-config.yml
#cloud-config

<!--T:50-->
coreos:
    units:
      - name: cloudstack-ssh-key.service
        command: restart
        runtime: yes
        content: |
          [Unit]
          Description=Sets SSH key from metadata

          <!--T:51-->
[Service]
          Type=oneshot
          StandardOutput=journal+console
          ExecStart=/usr/share/oem/bin/cloudstack-ssh-key
      - name: cloudstack-hostname.service
        command: restart
        runtime: yes
        content: |
          [Unit]
          Description=Sets hostname from metadata

          <!--T:52-->
[Service]
          Type=oneshot
          StandardOutput=journal+console
          ExecStart=/usr/share/oem/bin/cloudstack-hostname
      - name: cloudstack-cloudinit.service
        command: restart
        runtime: yes
        content: |
          [Unit]
          Description=Cloudinit from CloudStack-style metadata
          Requires=coreos-setup-environment.service
          After=coreos-setup-environment.service

          <!--T:53-->
[Service]
          Type=oneshot
          EnvironmentFile=/etc/environment
          ExecStart=/usr/share/oem/bin/cloudstack-coreos-cloudinit
      - name: etcd.service
        command: start
      - name: fleet.service
        command: start
    oem:
      id: cloudstack
      name: CloudStack
      version-id: 0.0.1-r3
      home-url: http://cloudstack.apache.org/
      bug-report-url: https://github.com/coreos/coreos-overlay
    etcd:
      discovery: https://discovery.etcd.io/b8069c9bd67eae5cf19689daf4ebdd66
      addr: 178.170.XX.ZZZ:4001
      peer-addr: 178.170.XX.ZZZ:7001
    fleet:
      public-ip: 178.170.XX.ZZZ
Comme pour votre première instance, supprimez le fichier /etc/machine-id et redémarrez l'instance :
core@CoreOSnode-2 ~ $ sudo rm -f /etc/machine-id
core@CoreOSnode-2 ~ $ sudo reboot
core@CoreOSnode-3 ~ $ sudo rm -f /etc/machine-id
core@CoreOSnode-3 ~ $ sudo reboot
Une fois redémarrées, vos 2 autres instances ont normalement rejoint votre cluster CoreOS/Etcd/Fleet :
core@CoreOSnode-1 ~ $ fleetctl list-machines
MACHINE         IP              METADATA
6eacee19...     178.170.XX.XXX  -
7e685988...     178.170.XX.YYY  -
87e15a4a...     178.170.XX.ZZZ  -
Si vos instances n'ont pas rejoint le cluster, pensez à vérifier que vos instances peuvent bien communiquer entre elles (connexions réseaux, règles parefeu/security group)
Maintenant que nous avons un cluster CoreOS/etcd/fleet de 3 instances, nous allons installer le panamax-remote-agent ainsi que le panamax-adapter :
On exécute le script d'installation de l'agent Panamax :
core@CoreOSnode-1 ~ $ sudo bash -c "$(curl http://download.panamax.io/agent/pmx-agent-install)"
  % Total    % Received % Xferd  Average Speed   Time    Time     Time  Current
                                 Dload  Upload   Total   Spent    Left  Speed
100   685  100   685    0     0   1756      0 --:--:-- --:--:-- --:--:--  3156
  % Total    % Received % Xferd  Average Speed   Time    Time     Time  Current
                                 Dload  Upload   Total   Spent    Left  Speed
100  8613  100  8613    0     0  27496      0 --:--:-- --:--:-- --:--:-- 27694
./
./pmx-agent
./README.md
./CHANGELOG.md
./openssl.cnf
./.version
Execute cd /root/pmx-agent && ./pmx-agent to invoke agent setup script.
Puis
core@CoreOSnode-1 ~ $ sudo bash -c "$(curl http://download.panamax.io/agent/pmx-agent-install)"
  % Total    % Received % Xferd  Average Speed   Time    Time     Time  Current
                                 Dload  Upload   Total   Spent    Left  Speed
100   685  100   685    0     0   1756      0 --:--:-- --:--:-- --:--:--  3156
  % Total    % Received % Xferd  Average Speed   Time    Time     Time  Current
                                 Dload  Upload   Total   Spent    Left  Speed
100  8613  100  8613    0     0  27496      0 --:--:-- --:--:-- --:--:-- 27694
./
./pmx-agent
./README.md
./CHANGELOG.md
./openssl.cnf
./.version
Execute cd /root/pmx-agent && ./pmx-agent to invoke agent setup script.
core@CoreOSnode-1 ~ $ sudo su
CoreOSnode-1 core # cd /root/pmx-agent

<!--T:65-->
███████╗ ██████╗  █████████╗ ██████╗  ██████████╗ ██████╗  ██╗  ██╗
██╔══██║  ╚═══██╗ ███╗  ███║  ╚═══██╗ ██║ ██╔ ██║  ╚═══██╗ ╚██╗██╔╝
██   ██║ ███████║ ███║  ███║ ███████║ ██║╚██║ ██║ ███████║  ╚███╔╝
███████╝ ███████║ ███║  ███║ ███████║ ██║╚██║ ██║ ███████║  ██╔██╗
██║      ███████║ ███║  ███║ ███████║ ██║╚██║ ██║ ███████║ ██╔╝ ██╗
╚═╝      ╚══════╝ ╚══╝  ╚══╝ ╚══════╝ ╚═╝ ╚═╝ ╚═╝ ╚══════╝ ╚═╝  ╚═╝

<!--T:66-->
<span class="notranslate">CenturyLink Labs</span> - http://www.centurylinklabs.com/

 <!--T:67-->
1) init:          First time installing Panamax Remote Agent! - Downloads and installs Panamax Remote Agent.
 2) restart:       Stops and Starts Panamax Remote Agent and Adapter.
 3) reinstall:     Deletes your current Panamax Remote Agent and Adapter and reinstalls latest version.
 4) check:         Checks for available updates for Panamax Remote Agent and Adapter.
 5) update:        Updates to latest Panamax Remote Agent and Adapter.
 6) delete:        Uninstalls Panamax Remote Agent and Adapter.
 7) debug:         Display your current Panamax settings.
 8) token:         Display your current Panamax Remote Agent token.
 9) help:          Show this help
10) quit
Please select one of the preceding options:
Tapez 1 pour installer le Panamax Remote Agent :
Please select one of the preceding options: 1

<!--T:70-->
Installing panamax remote agent/adapter...

<!--T:71-->
Installing Panamax adapter:

<!--T:72-->
Select the ochestrator you want to use:

<!--T:73-->
1) Kubernetes
2) CoreOS Fleet
3) Marathon
Please select one of the preceding options:
Choisissez l'orchestrateur "2) CoreOS Fleet" et indiquez votre ip :
Please select one of the preceding options: 2


<!--T:76-->
Enter the API endpoint to access the Fleet <span class="notranslate">cluster</span> (e.g: http://10.187.241.100:4001): http://178.170.XX.XXX:4001

<!--T:77-->
Starting Panamax Fleet adapter:

<!--T:78-->
docker pull centurylink/panamax-fleet-adapter:latest

<!--T:79-->
56b22791d9b3dac06e2348a6a867527ffae01a37ab374159be48bbafaf77334f

<!--T:80-->
Installing Panamax remote agent:
Enter the public hostname (dev.example.com, without 'http') or IP Address (ex: 206.x.x.x) of the agent: Enter the public hostname (dev.example.com, without 'http') or IP Address (ex: 206.x.x.x) of the agent: 178.170.XX.XXX
Enter the port to run the agent on (3001):

<!--T:81-->
Generating SSL Key

<!--T:82-->
docker pull centurylink/openssl:latest

<!--T:83-->
Generating RSA private key, 1024 bit long modulus
......++++++
..............................................................................++++++
e is 65537 (0x10001)
Generating a 4096 bit RSA private key
........................................................................................++
................................................................++
writing new private key to '/certs/pmx_remote_agent.key'
-----
No value provided for Subject Attribute C, skipped
No value provided for Subject Attribute ST, skipped
No value provided for Subject Attribute L, skipped
No value provided for Subject Attribute O, skipped
Signature ok
subject=/CN=178.170.XX.XXX
Getting Private key

<!--T:84-->
Starting Panamax remote agent:

<!--T:85-->
docker pull centurylink/panamax-remote-agent:latest

<!--T:86-->
524bc3b7db813d2f20f8dc028037ce8f42ecfc05ebe8c4f67a172e3f6125dc44

============================== START ============================== <!--T:87-->
aHR0cHM6Ly8xNzguMTcwLjY4LjE1NzozMDAxfDdiYzExYjNiLTMxZDEtNGM1NS1hZWNlLWFmNTRk
NGQ1NzkzNHxOVGs1TUdNMk5tVXRNV0UzWlMwME1EUmhMVGc1T0RNdFpqZGhZVEJqWTJVM1ptSm1D
Zz09fC0tLS0tQkVHSU4gQ0VSVElGSUNBVEUtLS0tLQpNSUlGRmpDQ0F2NmdBd0lCQWdJSkFKb003
cDJiRTd6aU1BMEdDU3FHU0liM0RRRUJCUVVBTUJreEZ6QVZCZ05WCkJBTU1EakUzT0M0eE56QXVO
amd1TVRVM01CNFhEVEUxTURZeE5qRTBOVGt6TjFvWERURTJNRFl4TlRFME5Ua3oKTjFvd0dURVhN
QlVHQTFVRUF3d09NVGM0TGpFM01DNDJPQzR4TlRjd2dnSWlNQTBHQ1NxR1NJYjNEUUVCQVFVQQpB
NElDRHdBd2dnSUtBb0lDQVFDZHFmOFVZM21RWnJpUTdLSTVJV0RuNkJuS3lIclkxTitZeE1OaVlj
WnRKSm5yCmt3UlhDQzRVelNDNEdrMmszcFIzeHppd0piN1VUYmRwMXUrQlhnYjgvVHV3dDhENUxp
MVovUzRudmVoUlA4N0YKa0trcENpeU8zUllyQXc0QkFqZVkvb2Jsem5nN2Y0T2dXYWhaamhnV201
SUJ0dWdndXVCTEVUcHNIcERXZWJpSQpOT0I3V2ZEQkh0RmRydkpLMEU2dEJzNjdVVkg0ZHdLNVcx
c0dNdjRsQTY4TGczdmFlWVpobHk0NGFpeGlPWUIzClV6TlUzN3h3eXFFbnVnU2MvM2x3VzhVRVdU
XXXXXXXXXXXXXXXXXXXXXXXXXXXXXXXXXXXXXXXXXXXXXXXXXXXXXXXXXXXXXXXXXXXXXXXXXXXX
XXXXXXXXXXXXXXXXXXXXXXXXXXXXXXXXXXXXXXXXXXXXXXXXXXXXXXXXXXXXXXXXXXXXXXXXXXXX
XXXXXXXXXXXXXXXXXXXXXXXXXXXXXXXXXXXXXXXXXXXXXXXXXXXXXXXXXXXXXXXXXXXXXXXXXXXX
XXXXXXXXXXXXXXXXXXXXXXXXXXXXXXXXXXXXXXXXXXXXXXXXXXXXXXXXXXXXXXXXXXXXXXXXXXXX
XXXXXXXXXXXXXXXXXXXXXXXXXXXXXXXXXXXXXXXXXXXXXXXXXXXXXXXXXXXXXXXXXXXXXXXXXXXX
XXXXXXXXXXXXXXXXXXXXXXXXXXXXXXXXXXXXXXXXXXXXXXXXXXXXXXXXXXXXXXXXXXXXXXXXXXXX
XXXXXXXXXXXXXXXXXXXXXXXXXXXXXXXXXXXXXXXXXXXXXXXXXXXXXXXXXXXXXXXXXXXXXXXXXXXX
XXXXXXXXXXXXXXXXXXXXXXXXXXXXXXXXXXXXXXXXXXXXXXXXXXXXXXXXXXXXXXXXXXXXXXXXXXXX
XXXXXXXXXXXXXXXXXXXXXXXXXXXXXXXXXXXXXXXXXXXXXXXXXXXXXXXXXXXXXXXXXXXXXXXXXXXX
cDBvTHdpOXVtS0VWeFQ5VjYrL1JsL3VoRHBlV09Nc3FOaVkyanBRVkhpZ1lWVVpKYlJhZ2xIbk42
NDBXZApRZUZBTnMvT29aQTFrdDN1cFR5MmtlVWljLzMzTzlidTArU0hFUEZpd2Fqa3dkUURudXl4
dGVRNnBJVEhhVDdSCmVoWEdDdDRmVXBSUjZsT2xGWjRTS2JjQmtBa3dZa2V5Y0N5VTltTkV3Yk1R
M0xJZmY5K0pSa3hqTXQ1YnRzTHgKWDk2d08zWURBYkc2NmxmQkh1TTJLNWZVck1yWDlUbmpmN0x5
Z0hjcnJWWmFiK2JjUkM2SzZVQnI1RTl4R2xKNgpGZHZMdkUySW5uQjkrRzIrM2V1OXh6UXVFWGpB
K2ZzUDJReDRJU2w3NGpYaTRWa3Ziem41TnhUVHJsRzNaYk9WCkp3NTRmV21lOHRwQ2N4Vit2V2JW
M0tCZ2JpMXRlKzRKTFZuV1VKTlpVUng5K2VUTG82UTd2Tm1iSG1RTS8wOHIKVWZIR1JSOGlPZGwr
NjlDZjNlUWwvenhCSVE2cXN4bGxzWTJMd3IvMGFFaURuUDRtNk5WUEtuSmN4VDNNbTRuZwp4TjdR
OXh6V08rWUdhdUVhaHNMUkF2QXhleFVPZkkrUHlmT0lYVFova1hJWjA1VWxVU3RoYUJ3bzFXRlVI
VnFWCjhxU1pjdEU0UGRneExSejNXclltZTdVWTJEbWJuUkJOVHlFOW0yeFJPVEh6RUlQWTdDVXZ3
MDh0ZFpHczNkbG8KbVdPSVcwMGk1MEROa1ArT1RyWm5OcHU3VVRjL3ZPQ3hSaGJyM1o4OTNyWXA3
SUlKT0VQWUFjT1pzMHRkQWNvQwowSldRRTZzUnFRT1dCQT09Ci0tLS0tRU5EIENFUlRJRklDQVRF
LS0tLS0K
============================== END ==============================


<!--T:88-->
Copy and paste the above (Not including start/end tags) to your local panamax client to connect to this remote agent.


<!--T:89-->
Remote Agent/Adapter installation complete!


<!--T:90-->
CoreOSnode-1 pmx-agent #
Comme cela est indiqué en fin d'installation, vous devez copier-coller (sans les lignes balises START/END) la clé privée de votre panamax remote agent dans l'UI Panamax lors de la création de votre Panamax Remote Deployment Target.
Ajouter votre Panamax Remote Deployment Target à votre Panamax UI
Pour ajouter votre Panamax Remote Deployment Target dans votre Panamax UI, connectez-vous à celle-ci via votre navigateur :
- allez dans "MANAGE"
- cliquez sur le nom d'un template peu importe lequel pour le moment (ex: "Wordpress with MySQL")
- cliquez sur le bouton "Run Template"
- cliquez sur "Deploy to Target" :
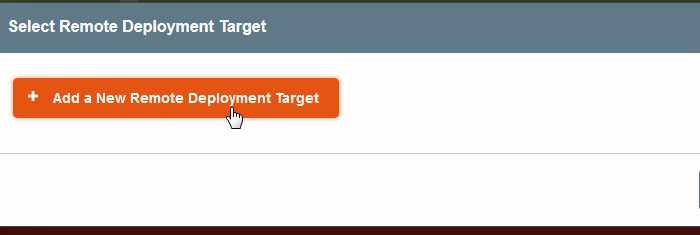
- Cliquez sur "Add a New Remote Deployment Target"
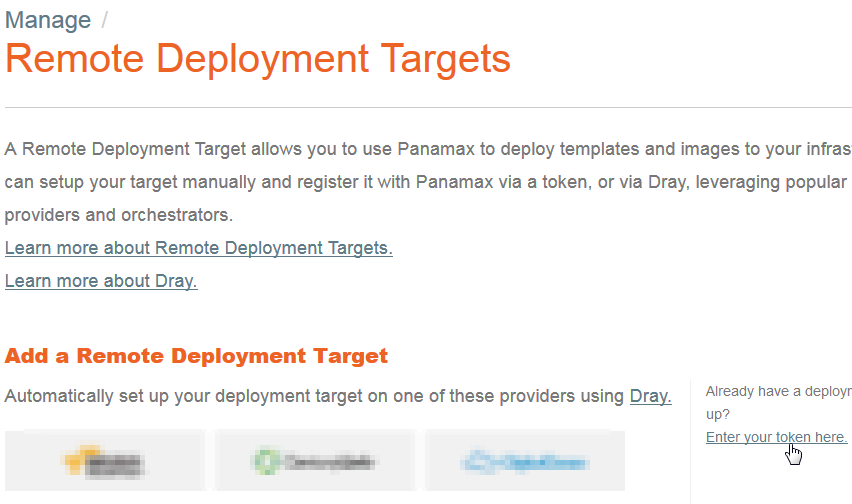
- Cliquez sur "Enter your token here." (en bas à droite de la page)
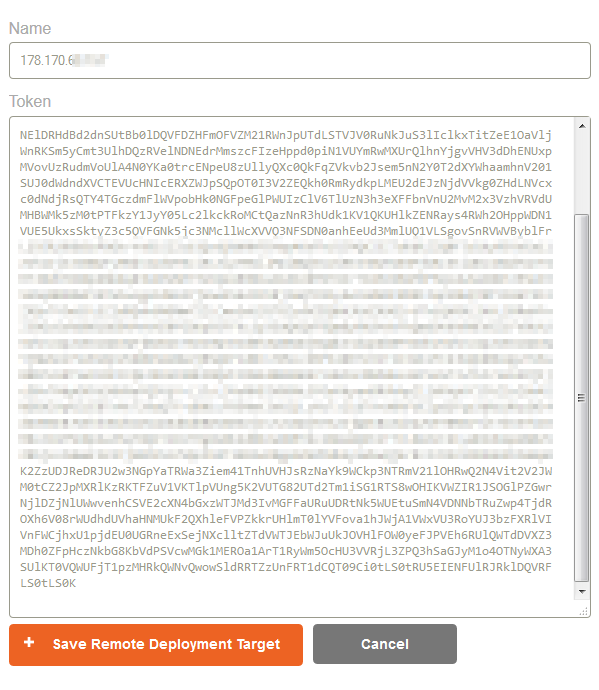
- Saisissez l'adresse ip de votre Panamax Remote Agent (que vous avez paramétré lors de son installation dans le champs "Name") puis copiez-collez la clé privé de l'agent retournée à la fin de l'installation du Panamax Remote Agent (sans les lignes balises START/END).
- Cliquez sur "Save Remote Deployment Target"
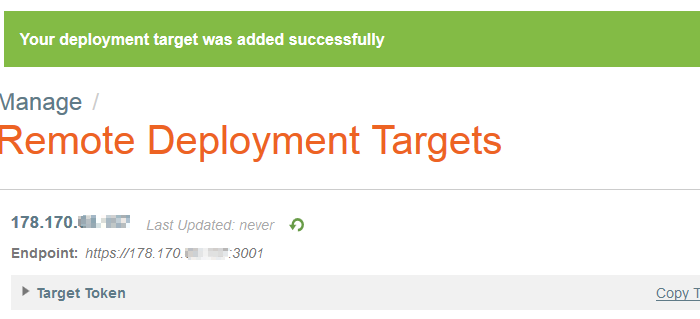
Vous devriez avoir le résultat suivant :
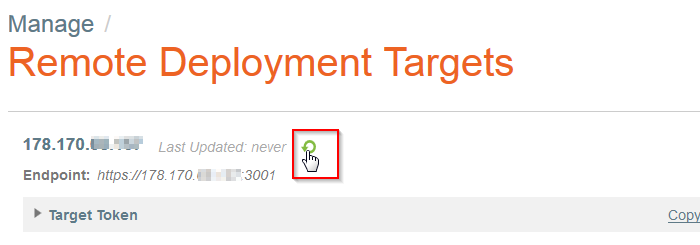
- Cliquez sur la flèche verte à gauche du nom de votre Remote Deployment Target puis forcer une première mise à jour :
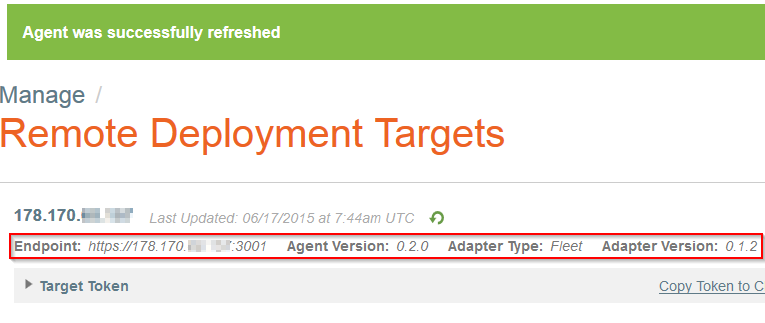
Après mise à jour, les informations sur votre Remote Deployment Targets telles que la version de votre Panamax Remote Agent, le type de votre Panamax Adapter et sa version :
Déploiement d'une application via Panamax UI
Il vous est maintenant possible de déployer une application disponible dans la market place "Panamax Templates & Docker Repositories" depuis votre Panamax UI sur votre Panamax Remote Deployment Target :
- Recherchez le nom de l'application que vous souhaitez déployer. Nous choisissons le template Century Link "Wordpress with MySQL"
- Vous pouvez cliquez sur "More Details" pour avoir plus d'informations sur le template que vous avez choisis. Vous pouvez également voir de combien d'image(s) Docker le template est constitué (dans notre cas 2 images)
- Cliquez sur "Run Template" pour déployer le menu et cliquez sur "Deploy to Target" :
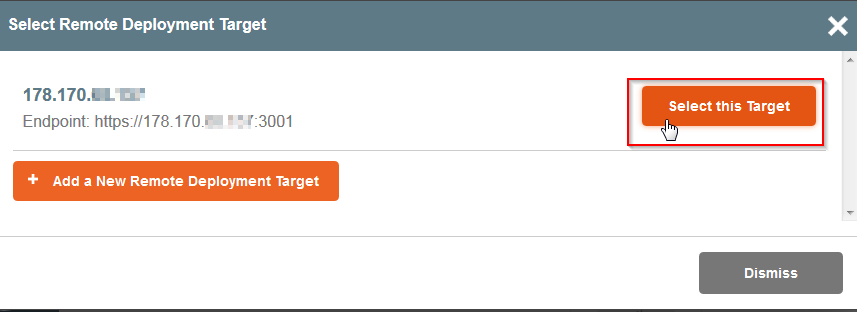
- Cliquez sur "Select this Target" pour sélectionner votre Remote Deployment Target
- Renseignez les éventuels champs de "Deployment Settings" de l'application que vous déployée (mot de passe, variables d'environnement,etc.) puis cliquez sur le bouton "Deploy to Target" en dessous pour valider
- Vous devriez avoir le résultat suivant :
Si vous vous connectez à vos instances de votre cluster CoreOS, vous pourrez voir que Panamax a réparti les containers Docker sur différents nodes/instances de votre cluster CoreOS :
- On peut voir que l'image centurylink/wordpress a été déployée sur notre première instance CoreOS :
core@CoreOSnode-1 ~ $ docker ps
CONTAINER ID        IMAGE                                      COMMAND                CREATED             STATUS              PO                                                        RTS                    NAMES
3206bda4e534        centurylink/wordpress:3.9.1                "/run.sh"              3 minutes ago       Up 3 minutes        0.                                                        0.0.0:8080->80/tcp     wp
84e3c5fe1886        centurylink/panamax-remote-agent:latest    "/panamax-remote-age   37 minutes ago      Up 37 minutes       0.                                                        0.0.0:3001->3000/tcp   pmx_agent
71009f7785d3        centurylink/panamax-fleet-adapter:latest   "rackup '-E producti   37 minutes ago      Up 37 minutes       92                                                        92/tcp                 pmx_adapter
- Et l'image centurylink/mysql sur notre troisième instance de notre cluster :
core@CoreOSnode-3 ~ $ docker ps
CONTAINER ID        IMAGE                   COMMAND                CREATED             STATUS              PORTS                    NAMES
84deeadd66fa        centurylink/mysql:5.5   "/usr/local/bin/run"   4 minutes ago       Up 4 minutes        0.0.0.0:3306->3306/tcp   db
- Nous pouvons également avoir certaines informations relatives aux déploiements des applications effectués via Panamax UI par l'intermédiaire de notre gestionnaire de cluster Etcd :
On retrouve nos 2 applications (Wordpress "WP" et MySQL "DB") :
core@CoreOSnode-1 ~ $ etcdctl ls --recursive /app
/app/DB
/app/DB/DB_SERVICE_HOST
/app/WP
/app/WP/WP_SERVICE_HOST
On peut également voir sur quel instance membre de notre cluster l'application a été déployée :
core@CoreOSnode-1 ~ $ etcdctl get /app/DB/DB_SERVICE_HOST
178.170.XX.XXX
core@CoreOSnode-1 ~ $ etcdctl get /app/WP/WP_SERVICE_HOST
178.170.XX.ZZZ
- Nous pouvons aussi avoir le statut des applications de notre cluster par Fleet qui le gestionnaire des applications dans notre cluster :
core@CoreOSnode-1 ~ $ fleetctl list-unit-files
UNIT            HASH    DSTATE          STATE           TARGET
db.service      0caad43 launched        launched        6eacee19.../178.170.XX.XXX
wp.service      417826f launched        launched        7e685988.../178.170.XX.ZZZ
- Nous pouvons vérifier le bon fonctionnement de notre Wordpress en y accédant avec les informations fournis dans les détails du template (dans notre cas sur le port 8080 ouvert au niveau du parefeu préalablement, nous aurions pu faire une redirection de port du 8080 sur le port 80 public dans le cas d'instances en zone avancée) :
Cet article vous a semblé utile ?




Activer l'actualisation automatique des commentaires