Différences entre versions de « Comment creer un modele compatible Cloud Ikoula »
| (45 versions intermédiaires par 10 utilisateurs non affichées) | |||
| Ligne 1 : | Ligne 1 : | ||
| + | <span data-link_translate_fr_title="Comment creer un modele compatible Cloud Ikoula" data-link_translate_fr_url="Comment creer un modele compatible Cloud Ikoula"></span>[[:fr:Comment creer un modele compatible Cloud Ikoula]][[fr:Comment creer un modele compatible Cloud Ikoula]] | ||
| + | <span data-link_translate_he_title="איך ליצור מודל תואם ענן Ikoula" data-link_translate_he_url="%D7%90%D7%99%D7%9A+%D7%9C%D7%99%D7%A6%D7%95%D7%A8+%D7%9E%D7%95%D7%93%D7%9C+%D7%AA%D7%95%D7%90%D7%9D+%D7%A2%D7%A0%D7%9F+Ikoula"></span>[[:he:איך ליצור מודל תואם ענן Ikoula]][[he:איך ליצור מודל תואם ענן Ikoula]] | ||
| + | <span data-link_translate_ro_title="Cum pentru a crea un model compatibil nor Ikoula" data-link_translate_ro_url="Cum+pentru+a+crea+un+model+compatibil+nor+Ikoula"></span>[[:ro:Cum pentru a crea un model compatibil nor Ikoula]][[ro:Cum pentru a crea un model compatibil nor Ikoula]] | ||
| + | <span data-link_translate_ru_title="Как создать совместимый модель облачных Ikoula" data-link_translate_ru_url="%D0%9A%D0%B0%D0%BA+%D1%81%D0%BE%D0%B7%D0%B4%D0%B0%D1%82%D1%8C+%D1%81%D0%BE%D0%B2%D0%BC%D0%B5%D1%81%D1%82%D0%B8%D0%BC%D1%8B%D0%B9+%D0%BC%D0%BE%D0%B4%D0%B5%D0%BB%D1%8C+%D0%BE%D0%B1%D0%BB%D0%B0%D1%87%D0%BD%D1%8B%D1%85+Ikoula"></span>[[:ru:Как создать совместимый модель облачных Ikoula]][[ru:Как создать совместимый модель облачных Ikoula]] | ||
| + | <span data-link_translate_pl_title="Jak utworzyć zgodnego modelu Cloud Ikoula" data-link_translate_pl_url="Jak+utworzy%C4%87+zgodnego+modelu+Cloud+Ikoula"></span>[[:pl:Jak utworzyć zgodnego modelu Cloud Ikoula]][[pl:Jak utworzyć zgodnego modelu Cloud Ikoula]] | ||
| + | <span data-link_translate_ja_title="雲 Ikoula の互換性のあるモデルを作成する方法" data-link_translate_ja_url="%E9%9B%B2+Ikoula+%E3%81%AE%E4%BA%92%E6%8F%9B%E6%80%A7%E3%81%AE%E3%81%82%E3%82%8B%E3%83%A2%E3%83%87%E3%83%AB%E3%82%92%E4%BD%9C%E6%88%90%E3%81%99%E3%82%8B%E6%96%B9%E6%B3%95"></span>[[:ja:雲 Ikoula の互換性のあるモデルを作成する方法]][[ja:雲 Ikoula の互換性のあるモデルを作成する方法]] | ||
| + | <span data-link_translate_ar_title="كيفية إنشاء نموذج متوافق مع "عكلة سحابة"" data-link_translate_ar_url="%D9%83%D9%8A%D9%81%D9%8A%D8%A9+%D8%A5%D9%86%D8%B4%D8%A7%D8%A1+%D9%86%D9%85%D9%88%D8%B0%D8%AC+%D9%85%D8%AA%D9%88%D8%A7%D9%81%D9%82+%D9%85%D8%B9+%22%D8%B9%D9%83%D9%84%D8%A9+%D8%B3%D8%AD%D8%A7%D8%A8%D8%A9%22"></span>[[:ar:كيفية إنشاء نموذج متوافق مع "عكلة سحابة"]][[ar:كيفية إنشاء نموذج متوافق مع "عكلة سحابة"]] | ||
| + | <span data-link_translate_zh_title="如何创建一个兼容模型云 Ikoula" data-link_translate_zh_url="%E5%A6%82%E4%BD%95%E5%88%9B%E5%BB%BA%E4%B8%80%E4%B8%AA%E5%85%BC%E5%AE%B9%E6%A8%A1%E5%9E%8B%E4%BA%91+Ikoula"></span>[[:zh:如何创建一个兼容模型云 Ikoula]][[zh:如何创建一个兼容模型云 Ikoula]] | ||
<span data-link_translate_de_title="Wie erstellen Sie ein kompatibles Modell Cloud Ikoula" data-link_translate_de_url="Wie+erstellen+Sie+ein+kompatibles+Modell+Cloud+Ikoula"></span>[[:de:Wie erstellen Sie ein kompatibles Modell Cloud Ikoula]][[de:Wie erstellen Sie ein kompatibles Modell Cloud Ikoula]] | <span data-link_translate_de_title="Wie erstellen Sie ein kompatibles Modell Cloud Ikoula" data-link_translate_de_url="Wie+erstellen+Sie+ein+kompatibles+Modell+Cloud+Ikoula"></span>[[:de:Wie erstellen Sie ein kompatibles Modell Cloud Ikoula]][[de:Wie erstellen Sie ein kompatibles Modell Cloud Ikoula]] | ||
<span data-link_translate_nl_title="Hoe maak een compatibel model Cloud Ikoula" data-link_translate_nl_url="Hoe+maak+een+compatibel+model+Cloud+Ikoula"></span>[[:nl:Hoe maak een compatibel model Cloud Ikoula]][[nl:Hoe maak een compatibel model Cloud Ikoula]] | <span data-link_translate_nl_title="Hoe maak een compatibel model Cloud Ikoula" data-link_translate_nl_url="Hoe+maak+een+compatibel+model+Cloud+Ikoula"></span>[[:nl:Hoe maak een compatibel model Cloud Ikoula]][[nl:Hoe maak een compatibel model Cloud Ikoula]] | ||
| Ligne 5 : | Ligne 13 : | ||
<span data-link_translate_es_title="Cómo crear un modelo compatible nube Ikoula" data-link_translate_es_url="C%C3%B3mo+crear+un+modelo+compatible+nube+Ikoula"></span>[[:es:Cómo crear un modelo compatible nube Ikoula]][[es:Cómo crear un modelo compatible nube Ikoula]] | <span data-link_translate_es_title="Cómo crear un modelo compatible nube Ikoula" data-link_translate_es_url="C%C3%B3mo+crear+un+modelo+compatible+nube+Ikoula"></span>[[:es:Cómo crear un modelo compatible nube Ikoula]][[es:Cómo crear un modelo compatible nube Ikoula]] | ||
<span data-link_translate_en_title="How create a compatible model Cloud Ikoula" data-link_translate_en_url="How+create+a+compatible+model+Cloud+Ikoula"></span>[[:en:How create a compatible model Cloud Ikoula]][[en:How create a compatible model Cloud Ikoula]] | <span data-link_translate_en_title="How create a compatible model Cloud Ikoula" data-link_translate_en_url="How+create+a+compatible+model+Cloud+Ikoula"></span>[[:en:How create a compatible model Cloud Ikoula]][[en:How create a compatible model Cloud Ikoula]] | ||
| − | |||
| + | {{#seo: | ||
| + | |title=Comment créer un modèle compatible Cloud Ikoula | ||
| + | |title_mode=append | ||
| + | |keywords=these,are,your,keywords | ||
| + | |description=Découvrez dans cet article comment creer un modele compatible Cloud Ikoula | ||
| + | |image=Uploaded_file.png | ||
| + | |image_alt=Wiki Logo | ||
| + | }} | ||
| − | + | ==Description== | |
| + | Nous allons suivre le déroulé complet de la création d'un modèle compatible avec le [https://www.ikoula.com/fr/cloud-public Cloud] Ikoula One à partir d'une installation _from scratch_ (à partir d'une iso). | ||
| + | Dans notre exemple nous allons utiliser une iso _netinstall_ de Debian à jour, nous expliquerons suite à l'installation les quelques étapes nécessaires pour rendre pleinnement compatible votre modèle. | ||
| − | + | ==Préparatifs== | |
| + | * Récupérer l'image ISO de votre choix, nous utiliserons l'image minimal _netinstall_ de Debian 9 'stretch' dans notre exemple | ||
| − | |||
| + | ===Enregsitrement de l'ISO=== | ||
| − | |||
| + | * Connectez-vous à votre interface de gestion [https://cloudstack.ikoula.com/client/ Cloud Ikoula One] | ||
| − | + | [[Fichier:Creation_model-cloud-00.png]] | |
| − | + | * Cliquez sur modèles | |
| + | [[Fichier:Creation_model-cloud-01.png]] | ||
| − | |||
| + | * Sélectionnez la vue ISO | ||
| − | [[Fichier: | + | [[Fichier:Creation_model-cloud-02.png]] |
| − | + | * Cliquez sur _Enregistrer ISO" | |
| + | [[Fichier:Creation_model-cloud-03.png]] | ||
| − | |||
| + | * Renseignez les informations nécessaires | ||
| − | + | [[Fichier:Creation_model-cloud-04.png]] | |
| − | 2 | + | <br> |
| + | 1 - Indiquez le nom que vous souhaitez pour votre image | ||
| + | <br> | ||
| + | 2 - Renseignez une description pour votre image | ||
| + | <br> | ||
| + | 3 - Saisissez / collez l'URL HTTP (non https) complète du fichier ISO | ||
| + | <br> | ||
| + | 4 - Sélectionnez la zone [https://www.ikoula.com/fr/cloud-public Cloud] Ikoula pour laquelle votre image sera disponible | ||
| + | <br> | ||
| + | 5 - Cochez cette case si vous souhaitez qu'une instance puisse démarrer depuis votre ISO | ||
| + | <br> | ||
| + | 6 - Indiquez le type de système de votre ISO, si votre système et la version de celui-ci est dans la liste sélectionnez-la sinon choisissez un des type "Other xxx" le plus adapté. Dans notre cas, Debian 9 n'était pas disponible dans la liste nous avons donc sélectionné "Other Linux (64-bit)" | ||
| + | <br> | ||
| + | 7 - Cochez cette case si vous souhaitez que votre ISO puisse être téléchargé une fois créée | ||
| + | <br> | ||
| + | <br> | ||
| + | PS : L'url doit être une url publique accessible sans authentification, vous pouvez utilisez votre espace Ikeepincloud. | ||
| − | |||
| − | + | * Une fois votre ISO enregistré, patientez le temps que le status prêt soit à _YES_ | |
| − | + | [[Fichier:Creation_model-cloud-05.png]] | |
| − | + | ===Déploiement de notre base=== | |
| − | |||
| + | * Cliquez sur _Instances_ dans le menu de gauche | ||
| − | + | [[Fichier:Creation_model-cloud-06.png]] | |
| − | + | * Cliquez sur _Ajouter une instance_ | |
| + | [[Fichier:Creation_model-cloud-07.png]] | ||
| − | |||
| + | * Sélectionner la zone dans laquelle votre ISO à été enregistrée | ||
| − | [[Fichier: | + | [[Fichier:Creation_model-cloud-08.png]] |
| − | + | * Sélectionnez ISO afin de charger votre iso au démarrage de l'instance | |
| + | [[Fichier:Creation_model-cloud-09.png]] | ||
| − | |||
| + | * Choisissez votre ISO dans la catégorie _Mes ISOs_ | ||
| − | + | [[Fichier:Creation_model-cloud-10.png]] | |
| − | + | * Sélectionnez une offre de calcul, cette offre ne sera pas enregistré dans le modèle. | |
| − | + | * Ajouter une offre de disque à votre Base à la taille voulue, pour cet exemple nous choisissons 15 Go | |
| + | [[Fichier:Creation_model-cloud-11.png]] | ||
| − | |||
| + | * Poursuivez les étapes classiques pour le déploiement de votre instance (affinité, réseau, et descriptif) et déployez votre instance. | ||
| − | + | ===Modification de notre base=== | |
| + | Une fois votre instance démarrer il vous faudra vous connecter à l'aide du KVM virtuel pour procéder à l'installation du système et à sa configuration minimale (réseau, mots de passe, etc). | ||
| − | |||
| + | * Pour vous connecter une fois avoir sélectionner votre instance cliquez sur l'icône en haut | ||
| − | + | [[Fichier:Creation_model-cloud-12.png]] | |
| − | + | Vous devriez avoir accès à votre instance depuis une pop-up au travers de laquelle vous pourrez procéder à l'installation de votre système. | |
| − | [[Fichier: | + | [[Fichier:Creation_model-cloud-13.png]] |
| − | + | Cette fenêtre est en fait une console KVM vers votre instance, vous permettant ainsi de prendre la main dessus même si vous n'avez pas d'accès réseau à celle-ci. | |
| + | ===Installation de votre base et personnalisation=== | ||
| − | + | Voici les quelques points importants durant l'installation de la base pour la création d'un modèle compatible Cloud Ikoula One : | |
| + | 1 - Réseau : lors de l'installation un bail DHCP est offert à l'instance, laisser la configuration automatique de votre réseau s’effectuer par l'installateur | ||
| + | <br> | ||
| + | 2 - Partitionnement : Nous recommandons vivement l'utilisation de LVM pour permettre plus de flexibilité à votre modèle, vous trouverez ci-joint un plan de partitionnement en exemple. | ||
| + | <pre> | ||
| + | Table de partition du disque xvda en _GPT_ | ||
| + | - Partition de type _ext2_ de 1Go nommé boot avec comme point de montage /boot | ||
| + | - Groupe de volume vg01 contenant : | ||
| + | - Volume logique swap de 1Go | ||
| + | - Volume logique root du restant de votre disque | ||
| + | - Partition du type _swap_ | ||
| + | - Partition de type _ext4_ nommé root avec comme point de montage / | ||
| + | </pre> | ||
| + | 3 - Installer un serveur ssh et le configurer pour permettre la connexion | ||
| + | <br> | ||
| + | 4 - Ouvrir et rediriger les ports nécessaires à la connexion ssh et à l'installation de paquets. | ||
| + | <br> | ||
| + | * Après installation du système de base détacher l'iso | ||
| − | + | [[Fichier:Creation_model-cloud-14.png]] | |
| − | + | * Connectez-vous à l'instance après un dernier redémarrage du système avec l'ISO détaché | |
| − | |||
| − | |||
| − | |||
| − | |||
| − | |||
| − | |||
| − | |||
| − | |||
| − | |||
| − | |||
| − | |||
| − | |||
| − | |||
| − | |||
| − | |||
| − | |||
| − | |||
| − | |||
| − | |||
| − | |||
| − | |||
| − | |||
| − | |||
| − | |||
| − | |||
| − | |||
| − | |||
| − | |||
| − | |||
| − | |||
| − | |||
| − | |||
| − | |||
| − | |||
| − | |||
| − | |||
| − | |||
| − | |||
| − | |||
| − | |||
| − | |||
| − | |||
| − | |||
| + | [[Fichier:Creation_model-cloud-15.png]] | ||
| + | <br> | ||
| + | <br> | ||
| + | Ps : Dans notre exemple nous utliserons Putty https://putty.org/ | ||
| + | <br> | ||
| + | Vous pouvez ainsi vérifier que tout soit en ordre au niveau du disque et des partitions : | ||
| + | <br> | ||
<syntaxhighlight lang="bash"> | <syntaxhighlight lang="bash"> | ||
| − | + | root@Demo-Model-Ikoula:~# lsblk | |
| − | + | NAME MAJ:MIN RM SIZE RO TYPE MOUNTPOINT | |
| − | + | sr0 11:0 1 1024M 0 rom | |
| − | + | xvda 202:0 0 15G 0 disk | |
| − | + | ├─xvda1 202:1 0 953M 0 part /boot | |
| − | + | └─xvda2 202:2 0 14.1G 0 part | |
| − | + | ├─vg01-swap 254:0 0 952M 0 lvm [SWAP] | |
| − | + | └─vg01-root 254:1 0 13.1G 0 lvm / | |
| − | |||
| − | |||
| − | |||
| − | |||
| − | |||
| − | |||
| − | |||
| − | |||
| − | |||
| − | |||
| − | |||
| − | |||
| − | |||
| − | |||
| − | |||
</syntaxhighlight> | </syntaxhighlight> | ||
| − | + | <br> | |
| − | |||
<syntaxhighlight lang="bash"> | <syntaxhighlight lang="bash"> | ||
| − | + | root@Demo-Model-Ikoula:~# fdisk -l | |
| − | + | Disk /dev/xvda: 15 GiB, 16106127360 bytes, 31457280 sectors | |
| − | + | Units: sectors of 1 * 512 = 512 bytes | |
| − | + | Sector size (logical/physical): 512 bytes / 512 bytes | |
| − | + | I/O size (minimum/optimal): 512 bytes / 512 bytes | |
| − | + | Disklabel type: gpt | |
| − | + | Disk identifier: 4F115A5C-B4BC-4910-952A-52DA2BAF6F91 | |
| − | |||
| − | |||
| − | |||
| − | |||
| + | Device Start End Sectors Size Type | ||
| + | /dev/xvda1 2048 1953791 1951744 953M Linux filesystem | ||
| + | /dev/xvda2 1953792 31455231 29501440 14.1G Linux LVM | ||
| − | |||
| + | Disk /dev/mapper/vg01-swap: 952 MiB, 998244352 bytes, 1949696 sectors | ||
| + | Units: sectors of 1 * 512 = 512 bytes | ||
| + | Sector size (logical/physical): 512 bytes / 512 bytes | ||
| + | I/O size (minimum/optimal): 512 bytes / 512 bytes | ||
| − | |||
| − | |||
| − | |||
| − | + | Disk /dev/mapper/vg01-root: 13.1 GiB, 14105444352 bytes, 27549696 sectors | |
| − | + | Units: sectors of 1 * 512 = 512 bytes | |
| − | + | Sector size (logical/physical): 512 bytes / 512 bytes | |
| − | + | I/O size (minimum/optimal): 512 bytes / 512 bytes | |
| − | |||
| − | |||
| − | |||
| − | |||
| − | |||
| − | |||
| − | |||
| − | |||
| − | |||
| − | |||
| − | |||
</syntaxhighlight> | </syntaxhighlight> | ||
| − | + | <br> | |
| − | |||
| − | |||
| − | |||
| − | |||
<syntaxhighlight lang="bash"> | <syntaxhighlight lang="bash"> | ||
| − | + | root@Demo-Model-Ikoula:~# pvs | |
| − | + | PV VG Fmt Attr PSize PFree | |
| + | /dev/xvda2 vg01 lvm2 a-- 14.07g 0 | ||
</syntaxhighlight> | </syntaxhighlight> | ||
| − | + | <br> | |
| − | |||
| − | |||
| − | |||
| − | |||
<syntaxhighlight lang="bash"> | <syntaxhighlight lang="bash"> | ||
| − | + | root@Demo-Model-Ikoula:~# vgs | |
| − | + | VG #PV #LV #SN Attr VSize VFree | |
| − | + | vg01 1 2 0 wz--n- 14.07g | |
| − | |||
| − | |||
| − | |||
| − | |||
| − | |||
| − | |||
| − | |||
| − | |||
</syntaxhighlight> | </syntaxhighlight> | ||
| − | + | <br> | |
| − | |||
| − | |||
| − | |||
| − | |||
<syntaxhighlight lang="bash"> | <syntaxhighlight lang="bash"> | ||
| − | + | root@Demo-Model-Ikoula:~# lvs | |
| − | + | LV VG Attr LSize Pool Origin Data% Meta% Move Log Cpy%Sync Convert | |
| − | + | root vg01 -wi-ao---- 13.14g | |
| − | + | swap vg01 -wi-ao---- 952.00m | |
| − | |||
| − | |||
| − | |||
| − | |||
| − | |||
| − | |||
| − | |||
| − | |||
| − | |||
| − | |||
| − | |||
| − | |||
| − | |||
| − | |||
| − | |||
| − | |||
| − | |||
| − | |||
| − | |||
| − | |||
| − | |||
</syntaxhighlight> | </syntaxhighlight> | ||
| − | + | * Configuration des locales | |
| + | Afin de pouvoir faire fonctionner certains scripts dont celui pour le redimensionnement nous devons basculer les loacles systèmes en anglais pour éviter ainsi une traduction des unités de tailles des systèmes de fichiers et partitions par l'utilitaire gdisk. | ||
<syntaxhighlight lang="bash"> | <syntaxhighlight lang="bash"> | ||
| − | + | localectl set-locale en_US.utf8 | |
| − | |||
| − | |||
| − | |||
| − | |||
| − | |||
| − | |||
| − | |||
| − | |||
| − | |||
| − | |||
| − | |||
| − | |||
| − | |||
| − | |||
| − | |||
| − | |||
| − | |||
</syntaxhighlight> | </syntaxhighlight> | ||
| + | <br> | ||
| + | <br> | ||
| + | PS : ne changez rien d'autre, si vous avez configuré votre système pour utiliser un clavier français vous resterez bien en _AZERTY_ | ||
| − | + | * Installation des paquets cloud-init | |
| − | |||
<syntaxhighlight lang="bash"> | <syntaxhighlight lang="bash"> | ||
| − | + | root@Demo-Model-Ikoula:~# apt install cloud-init cloud-guest-utils parted gdisk | |
| + | Reading package lists... Done | ||
| + | Building dependency tree | ||
| + | Reading state information... Done | ||
| + | parted is already the newest version (3.2-17). | ||
| + | The following additional packages will be installed: | ||
| + | libyaml-0-2 python3-blinker python3-configobj python3-jinja2 python3-json-pointer python3-jsonpatch python3-jwt python3-markupsafe python3-oauthlib python3-prettytable python3-yaml | ||
| + | Suggested packages: | ||
| + | python-blinker-doc python-configobj-doc python-jinja2-doc python3-crypto | ||
| + | The following NEW packages will be installed: | ||
| + | cloud-guest-utils cloud-init gdisk libyaml-0-2 python3-blinker python3-configobj python3-jinja2 python3-json-pointer python3-jsonpatch python3-jwt python3-markupsafe python3-oauthlib python3-prettytable | ||
| + | python3-yaml | ||
| + | 0 upgraded, 14 newly installed, 0 to remove and 0 not upgraded. | ||
| + | Need to get 997 kB of archives. | ||
| + | After this operation, 4,660 kB of additional disk space will be used. | ||
| + | Do you want to continue? [Y/n] | ||
</syntaxhighlight> | </syntaxhighlight> | ||
| + | <br> | ||
| + | <br> | ||
| + | - Le paquet cloud-init vous permettra d'utiliser les scripts gérant la mise à jour du hostname de l'instance, du mots de passe root de celle-ci ainsi que de l'injection de potentiel clé ssh présente sur votre compte Cloud Ikoula One. | ||
| + | <br> | ||
| + | - Le paquet cloud-guest-utils permet quant à lui d'utiliser un quatrième script autorisant le redimensionnement au démarrage du partitionnement et du système de fichier de l'instance. | ||
| + | <br> | ||
| + | - Le paquet gdisk est utilisé par le paquet cloud-guest-utils durant l’agrandissement du système de fichier et de partition. | ||
| + | <br> | ||
| + | - Le paquet parted quand à lui permettra de facilement avoir accès à la table de partition au format GPT. | ||
| + | <br> | ||
| + | <br> | ||
| + | PS : pour les distribution de basé sur les RPM comme CentOS le paquet cloud-guest-utils est remplacé par le paquet cloud-growpart. | ||
| − | + | * Configuration de la partie cloud-init | |
| + | Après installation des paquets nécessaires nous allons procéder à la configuration et l'optimisation de celle-ci. | ||
| − | + | 6 - Configuration et optimisation du fichier de configuration principale, le fichier est placé dans /etc/cloud/coud.cfg | |
| − | |||
| − | |||
| − | |||
| − | |||
| − | |||
| − | |||
| − | |||
| − | |||
| − | |||
| − | |||
| − | |||
| − | |||
| − | |||
| − | |||
| − | |||
| − | |||
| − | |||
| − | |||
| − | |||
| − | |||
<syntaxhighlight lang="bash"> | <syntaxhighlight lang="bash"> | ||
| − | + | # The top level settings are used as module | |
| − | + | # and system configuration. | |
| − | |||
| + | # A set of users which may be applied and/or used by various modules | ||
| + | # when a 'default' entry is found it will reference the 'default_user' | ||
| + | # from the distro configuration specified below | ||
| + | users: | ||
| + | - default | ||
| − | + | # If this is set, 'root' will not be able to ssh in and they | |
| + | # will get a message to login instead as the above $user (ubuntu) | ||
| + | disable_root: false | ||
| + | # This will cause the set+update hostname module to not operate (if true) | ||
| + | preserve_hostname: false | ||
| − | + | # Example datasource config | |
| − | # | + | # datasource: |
| − | + | # Ec2: | |
| − | + | # metadata_urls: [ 'blah.com' ] | |
| − | + | # timeout: 5 # (defaults to 50 seconds) | |
| − | + | # max_wait: 10 # (defaults to 120 seconds) | |
| − | # | + | # The modules that run in the 'init' stage |
| − | + | cloud_init_modules: | |
| + | - migrator | ||
| + | - bootcmd | ||
| + | - write-files | ||
| + | - resizefs | ||
| + | - set_hostname | ||
| + | - update_hostname | ||
| + | - update_etc_hosts | ||
| + | - ca-certs | ||
| + | - rsyslog | ||
| + | - users-groups | ||
| + | - ssh | ||
| − | # | + | # The modules that run in the 'config' stage |
| − | + | cloud_config_modules: | |
| − | + | # Emit the cloud config ready event | |
| − | + | # this can be used by upstart jobs for 'start on cloud-config'. | |
| − | + | - emit_upstart | |
| − | + | - mounts | |
| + | - ssh-import-id | ||
| + | - locale | ||
| + | - set-passwords | ||
| + | - grub-dpkg | ||
| + | - apt-pipelining | ||
| + | - apt-configure | ||
| + | - package-update-upgrade-install | ||
| + | - landscape | ||
| + | - timezone | ||
| + | - puppet | ||
| + | - chef | ||
| + | - salt-minion | ||
| + | - mcollective | ||
| + | - disable-ec2-metadata | ||
| + | - runcmd | ||
| + | - byobu | ||
| − | # | + | # The modules that run in the 'final' stage |
| − | + | cloud_final_modules: | |
| − | + | - rightscale_userdata | |
| + | - scripts-per-once | ||
| + | - scripts-per-boot | ||
| + | - scripts-per-instance | ||
| + | - scripts-user | ||
| + | - ssh-authkey-fingerprints | ||
| + | - keys-to-console | ||
| + | - phone-home | ||
| + | - final-message | ||
| + | - power-state-change | ||
| − | # | + | # System and/or distro specific settings |
| − | + | # (not accessible to handlers/transforms) | |
| − | + | system_info: | |
| − | + | # This will affect which distro class gets used | |
| − | + | distro: debian | |
| − | + | default_user: | |
| + | name: root | ||
| − | + | # Other config here will be given to the distro class and/or path classes | |
| − | + | paths: | |
| − | + | cloud_dir: /var/lib/cloud/ | |
| − | + | templates_dir: /etc/cloud/templates/ | |
| − | + | package_mirrors: | |
| − | + | - arches: [amd64] | |
| − | + | failsafe: | |
| − | + | primary: http://mirror.debian.ikoula.com/debian/ | |
| − | |||
| − | |||
| − | |||
| − | |||
| − | |||
| − | |||
| − | |||
| − | |||
| − | |||
| − | |||
| − | |||
| − | |||
| − | |||
| − | |||
| − | |||
| − | |||
| − | |||
| − | |||
| − | |||
| − | |||
| − | |||
| − | |||
| − | |||
| − | |||
| − | |||
| − | |||
| − | |||
| − | |||
| − | |||
| − | |||
| − | |||
| − | |||
| − | |||
| − | |||
| − | [ | ||
| − | |||
| − | |||
| − | |||
| − | |||
| − | |||
| − | |||
| − | |||
| − | |||
| − | |||
| − | |||
| − | |||
| − | |||
| − | |||
| − | |||
| − | |||
| − | |||
| − | |||
| − | |||
| − | |||
</syntaxhighlight> | </syntaxhighlight> | ||
| − | + | <br> | |
| − | + | 7 - Configuration et optimisation du logging, le fichier est placé dans /etc/cloud/cloud.cfg.d/05_logging.cfg | |
| − | + | <br> | |
| − | + | Vous pouvez si vous le désirez limité la façon dont Cloud Init log les évenements sur votre instance en modifiant au besoin le niveau de LOG qui est fixé à DEBUG. | |
| − | + | <br> | |
| − | - | + | Cette FAQ vous explique ce que vous pouvez utilisez, nous recommandons l'utilisation 'da minima le niveau Warning permettant de détecter les erreurs mais ne vous poulluant pas de log si tout va bien. |
| − | + | <br> | |
| − | + | Documentation Logging Python https://docs.python.org/3/library/logging.config.html#configuration-file-format | |
| + | <br> | ||
<syntaxhighlight lang="bash"> | <syntaxhighlight lang="bash"> | ||
| − | + | ## This yaml formated config file handles setting | |
| − | -- | + | ## logger information. The values that are necessary to be set |
| − | + | ## are seen at the bottom. The top '_log' are only used to remove | |
| − | + | ## redundency in a syslog and fallback-to-file case. | |
| − | + | ## | |
| − | + | ## The 'log_cfgs' entry defines a list of logger configs | |
| − | + | ## Each entry in the list is tried, and the first one that | |
| − | + | ## works is used. If a log_cfg list entry is an array, it will | |
| − | + | ## be joined with '\n'. | |
| − | + | _log: | |
| − | + | - &log_base | | |
| − | + | [loggers] | |
| − | + | keys=root,cloudinit | |
| − | |||
| − | |||
| − | |||
| − | |||
| − | |||
| − | |||
| − | |||
| − | |||
| − | |||
| − | |||
| − | |||
| − | |||
| − | |||
| − | |||
| − | |||
| − | |||
| − | |||
| − | |||
| − | |||
| + | [handlers] | ||
| + | keys=consoleHandler,cloudLogHandler | ||
| − | + | [formatters] | |
| − | [ | + | keys=simpleFormatter,arg0Formatter |
| − | |||
| − | |||
| + | [logger_root] | ||
| + | level=DEBUG | ||
| + | handlers=consoleHandler,cloudLogHandler | ||
| − | + | [logger_cloudinit] | |
| + | level=DEBUG | ||
| + | qualname=cloudinit | ||
| + | handlers= | ||
| + | propagate=1 | ||
| + | [handler_consoleHandler] | ||
| + | class=StreamHandler | ||
| + | level=WARNING | ||
| + | formatter=arg0Formatter | ||
| + | args=(sys.stderr,) | ||
| − | + | [formatter_arg0Formatter] | |
| − | [ | + | format=%(asctime)s - %(filename)s[%(levelname)s]: %(message)s |
| − | |||
| − | [ | ||
| − | |||
| − | |||
| − | - | + | [formatter_simpleFormatter] |
| + | format=[CLOUDINIT] %(filename)s[%(levelname)s]: %(message)s | ||
| + | - &log_file | | ||
| + | [handler_cloudLogHandler] | ||
| + | class=FileHandler | ||
| + | level=DEBUG | ||
| + | formatter=arg0Formatter | ||
| + | args=('/var/log/cloud-init.log',) | ||
| + | - &log_syslog | | ||
| + | [handler_cloudLogHandler] | ||
| + | class=handlers.SysLogHandler | ||
| + | level=DEBUG | ||
| + | formatter=simpleFormatter | ||
| + | args=("/dev/log", handlers.SysLogHandler.LOG_USER) | ||
| + | log_cfgs: | ||
| + | # Array entries in this list will be joined into a string | ||
| + | # that defines the configuration. | ||
| + | # | ||
| + | # If you want logs to go to syslog, uncomment the following line. | ||
| + | # - [ *log_base, *log_syslog ] | ||
| + | # | ||
| + | # The default behavior is to just log to a file. | ||
| + | # This mechanism that does not depend on a system service to operate. | ||
| + | - [ *log_base, *log_file ] | ||
| + | # A file path can also be used. | ||
| + | # - /etc/log.conf | ||
| − | + | # This tells cloud-init to redirect its stdout and stderr to | |
| − | + | # 'tee -a /var/log/cloud-init-output.log' so the user can see output | |
| − | + | # there without needing to look on the console. | |
| − | + | output: {all: '| tee -a /var/log/cloud-init-output.log'} | |
| − | |||
| − | |||
| − | |||
| − | |||
| − | |||
</syntaxhighlight> | </syntaxhighlight> | ||
| − | + | <br> | |
| − | + | 8 - Configuration et optimisation pour le Cloud Ikoula One, le fichier est placé dans /etc/cloud/coud.cfg.d/99_cloudstack.cfg | |
| + | <br> | ||
<syntaxhighlight lang="bash"> | <syntaxhighlight lang="bash"> | ||
| − | + | datasource: | |
| − | + | CloudStack: {} | |
| − | + | None: {} | |
| − | + | datasource_list: | |
| − | + | - CloudStack | |
</syntaxhighlight> | </syntaxhighlight> | ||
| − | + | <br> | |
| − | + | 9 - Mise en place des scripts cloud-init propre à Ikoula | |
| − | + | <br> | |
| − | + | Vous pouvez récupérer le nécessaire à cet url : http://mirror.ikoula.com/pub/cio/ | |
| − | + | <br> | |
<syntaxhighlight lang="bash"> | <syntaxhighlight lang="bash"> | ||
| − | + | wget -nv -r -nH --cut-dirs=2 ftp://mirror.ikoula.com/pub/cio/cloud/ -P /var/lib/ | |
</syntaxhighlight> | </syntaxhighlight> | ||
| − | + | <br> | |
| − | + | 10 - Rendre exécutable les scripts : | |
| − | - | + | <br> |
| − | |||
| − | |||
<syntaxhighlight lang="bash"> | <syntaxhighlight lang="bash"> | ||
| − | + | chmod +x /var/lib/lib/cloud/scripts/per-boot/* /var/lib/lib/scripts/per-once/* | |
| − | |||
| − | |||
| − | |||
| − | |||
| − | |||
</syntaxhighlight> | </syntaxhighlight> | ||
| + | <br> | ||
| + | 11 - Nettoyage de votre système et fin de la personalisation | ||
| − | + | A partir de cette étape vous êtres libre d'installer et configurer au besoin d'autre paquets. | |
| − | + | <br> | |
| − | + | Vous pouvez nettoyer tous les fichiers de caches et de log afin de rendre vierge le système pour l'étape de création de modèle. | |
| − | + | <br> | |
| − | + | <br> | |
| − | + | PS : Nous vous recommandons de procédez avant nettoyage à une confirmation d'un mot de passe générique vous permettant si pour une raison inconu ou un oubli lors du'une étape de configuration que le mot de passe/et ou la clé SSH normalement fourni par Cloud Ikoula One ne soit pas valide vous ne parviendrez pas à vous connecter à l'instance. | |
| − | |||
| − | |||
| − | |||
| − | |||
| − | |||
| − | |||
| − | |||
| − | |||
| − | |||
| − | |||
| − | |||
| − | |||
| − | |||
| − | |||
| − | |||
| − | |||
| − | |||
| − | |||
| − | |||
| − | |||
| − | |||
| − | |||
| − | |||
| − | |||
| − | |||
| − | |||
| − | |||
| − | |||
| + | ==Création du modèle== | ||
| − | + | Maintenant que notre système de base est prêt nous pouvons procédez à l'extinction de l'instance et [[Créer un modèle à partir de mon Instance]] | |
| + | [[Fichier:Creation_model-cloud-16.png]] | ||
| − | |||
| + | Une fois enregistré dans la zone de déploiement de votre instance référence votre template est visible dans la partie Modèles de votre interface de gestion Cloud Ikoula One | ||
| − | + | [[Fichier:Creation_model-cloud-17.png]] | |
| − | + | Vous pouvez vérifier la taille et les capacités dynamique et de personnalisation du mots de passe via l'orchestrateur directement depuis la page de votre template | |
| + | [[Fichier:Creation_model-cloud-18.png]] | ||
| − | + | ==Conclusion== | |
| + | Vous pourrez ainsi dorénavant créer vos propres modèles selon vos besoins et bénéficier d'une complète compatibilité avec le Cloud Ikoula One. | ||
| − | |||
| + | Cet article vous a semblé utile ? <vote /> | ||
[[category:cloudstack]] | [[category:cloudstack]] | ||
[[category:cloud public]] | [[category:cloud public]] | ||
[[category:cloud privé]] | [[category:cloud privé]] | ||
| − | + | [[category:Cloud]] | |
| − | |||
| − | |||
| − | |||
| − | |||
| − | |||
| − | |||
| − | |||
| − | |||
| − | |||
<br /> | <br /> | ||
<comments /> | <comments /> | ||
Version actuelle datée du 20 septembre 2021 à 14:00
fr:Comment creer un modele compatible Cloud Ikoula he:איך ליצור מודל תואם ענן Ikoula ro:Cum pentru a crea un model compatibil nor Ikoula ru:Как создать совместимый модель облачных Ikoula pl:Jak utworzyć zgodnego modelu Cloud Ikoula ja:雲 Ikoula の互換性のあるモデルを作成する方法 ar:كيفية إنشاء نموذج متوافق مع "عكلة سحابة" zh:如何创建一个兼容模型云 Ikoula de:Wie erstellen Sie ein kompatibles Modell Cloud Ikoula nl:Hoe maak een compatibel model Cloud Ikoula it:Come creare un modello compatibile Cloud Ikoula pt:Como criar um modelo compatível nuvem Ikoula es:Cómo crear un modelo compatible nube Ikoula en:How create a compatible model Cloud Ikoula
Description
Nous allons suivre le déroulé complet de la création d'un modèle compatible avec le Cloud Ikoula One à partir d'une installation _from scratch_ (à partir d'une iso). Dans notre exemple nous allons utiliser une iso _netinstall_ de Debian à jour, nous expliquerons suite à l'installation les quelques étapes nécessaires pour rendre pleinnement compatible votre modèle.
Préparatifs
- Récupérer l'image ISO de votre choix, nous utiliserons l'image minimal _netinstall_ de Debian 9 'stretch' dans notre exemple
Enregsitrement de l'ISO
- Connectez-vous à votre interface de gestion Cloud Ikoula One
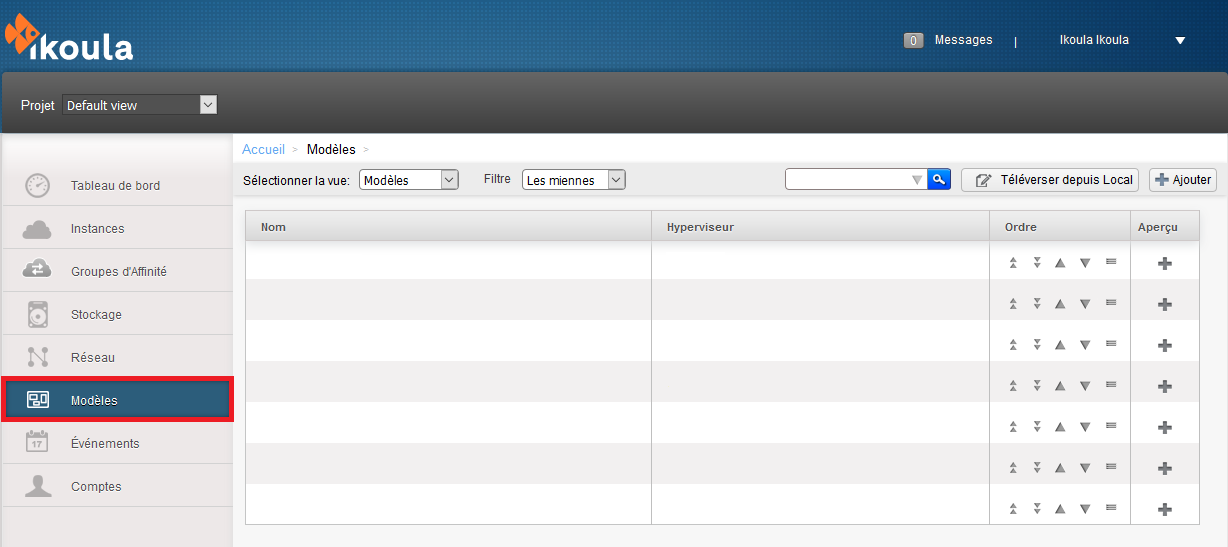
- Cliquez sur modèles
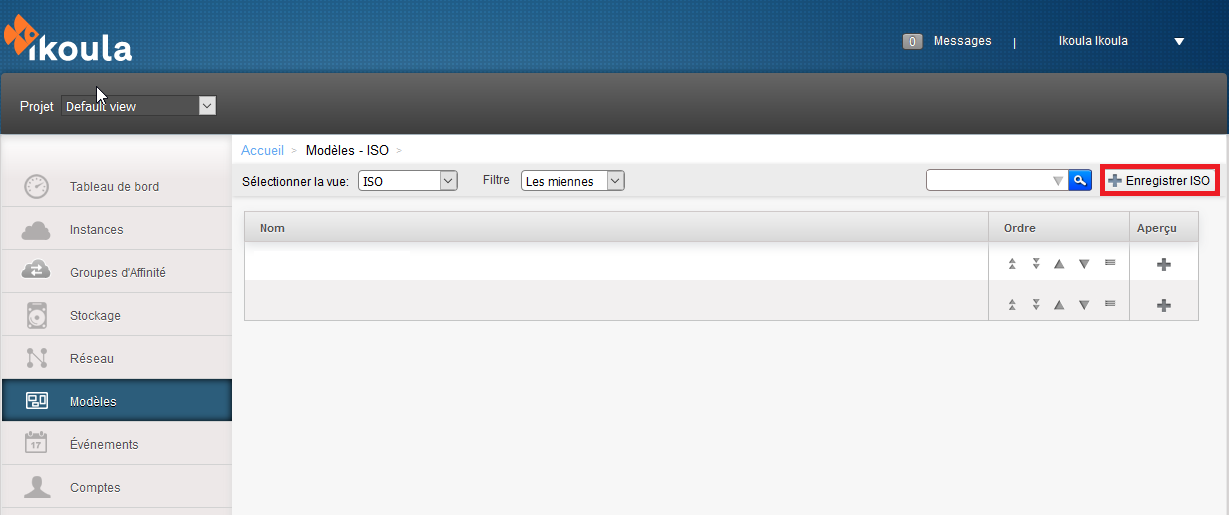
- Sélectionnez la vue ISO
- Cliquez sur _Enregistrer ISO"
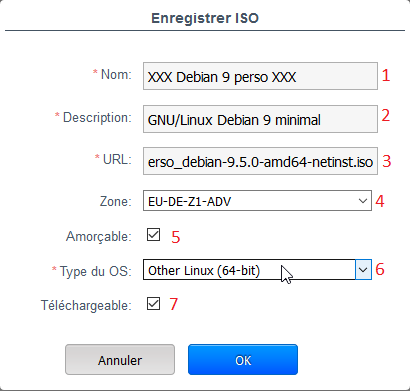
- Renseignez les informations nécessaires
1 - Indiquez le nom que vous souhaitez pour votre image
2 - Renseignez une description pour votre image
3 - Saisissez / collez l'URL HTTP (non https) complète du fichier ISO
4 - Sélectionnez la zone Cloud Ikoula pour laquelle votre image sera disponible
5 - Cochez cette case si vous souhaitez qu'une instance puisse démarrer depuis votre ISO
6 - Indiquez le type de système de votre ISO, si votre système et la version de celui-ci est dans la liste sélectionnez-la sinon choisissez un des type "Other xxx" le plus adapté. Dans notre cas, Debian 9 n'était pas disponible dans la liste nous avons donc sélectionné "Other Linux (64-bit)"
7 - Cochez cette case si vous souhaitez que votre ISO puisse être téléchargé une fois créée
PS : L'url doit être une url publique accessible sans authentification, vous pouvez utilisez votre espace Ikeepincloud.
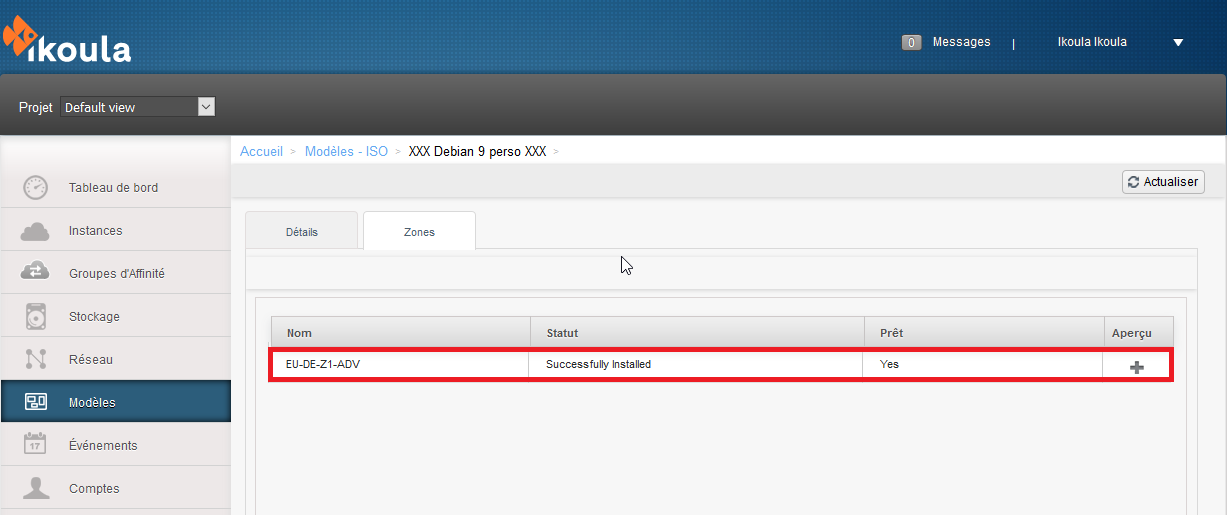
- Une fois votre ISO enregistré, patientez le temps que le status prêt soit à _YES_
Déploiement de notre base
- Cliquez sur _Instances_ dans le menu de gauche
- Cliquez sur _Ajouter une instance_
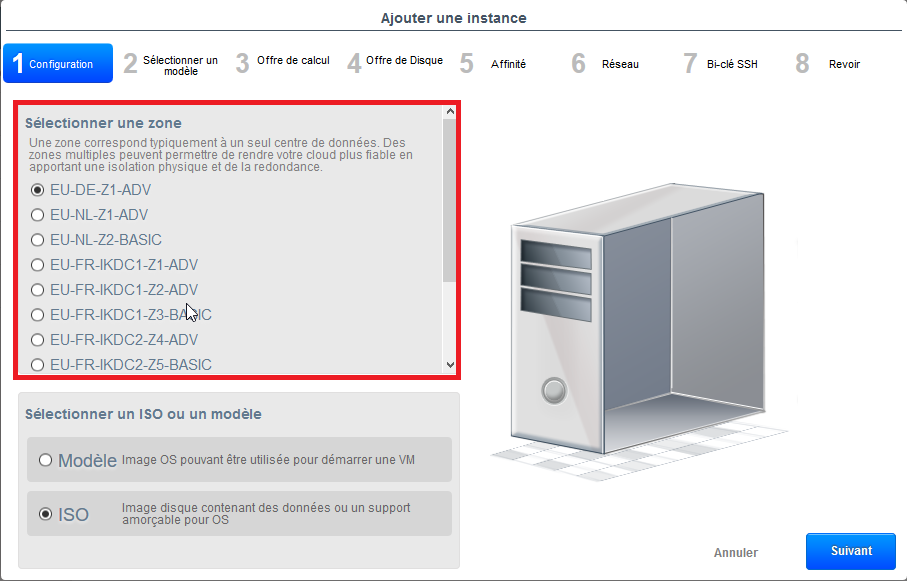
- Sélectionner la zone dans laquelle votre ISO à été enregistrée
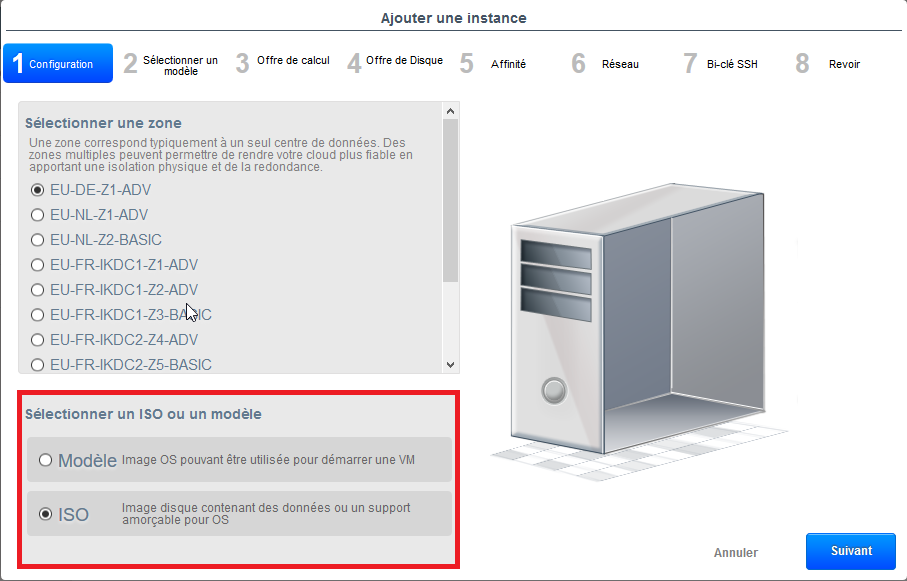
- Sélectionnez ISO afin de charger votre iso au démarrage de l'instance
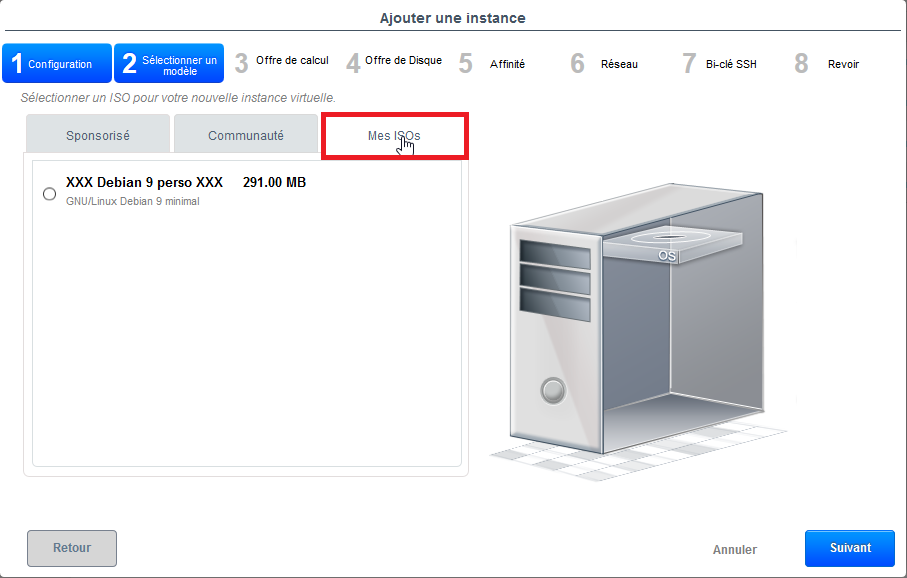
- Choisissez votre ISO dans la catégorie _Mes ISOs_
- Sélectionnez une offre de calcul, cette offre ne sera pas enregistré dans le modèle.
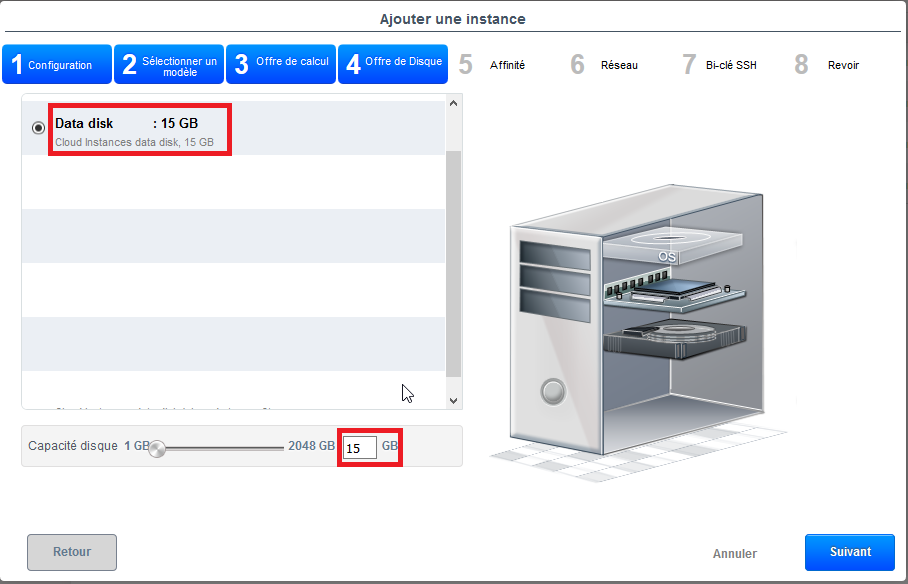
- Ajouter une offre de disque à votre Base à la taille voulue, pour cet exemple nous choisissons 15 Go
- Poursuivez les étapes classiques pour le déploiement de votre instance (affinité, réseau, et descriptif) et déployez votre instance.
Modification de notre base
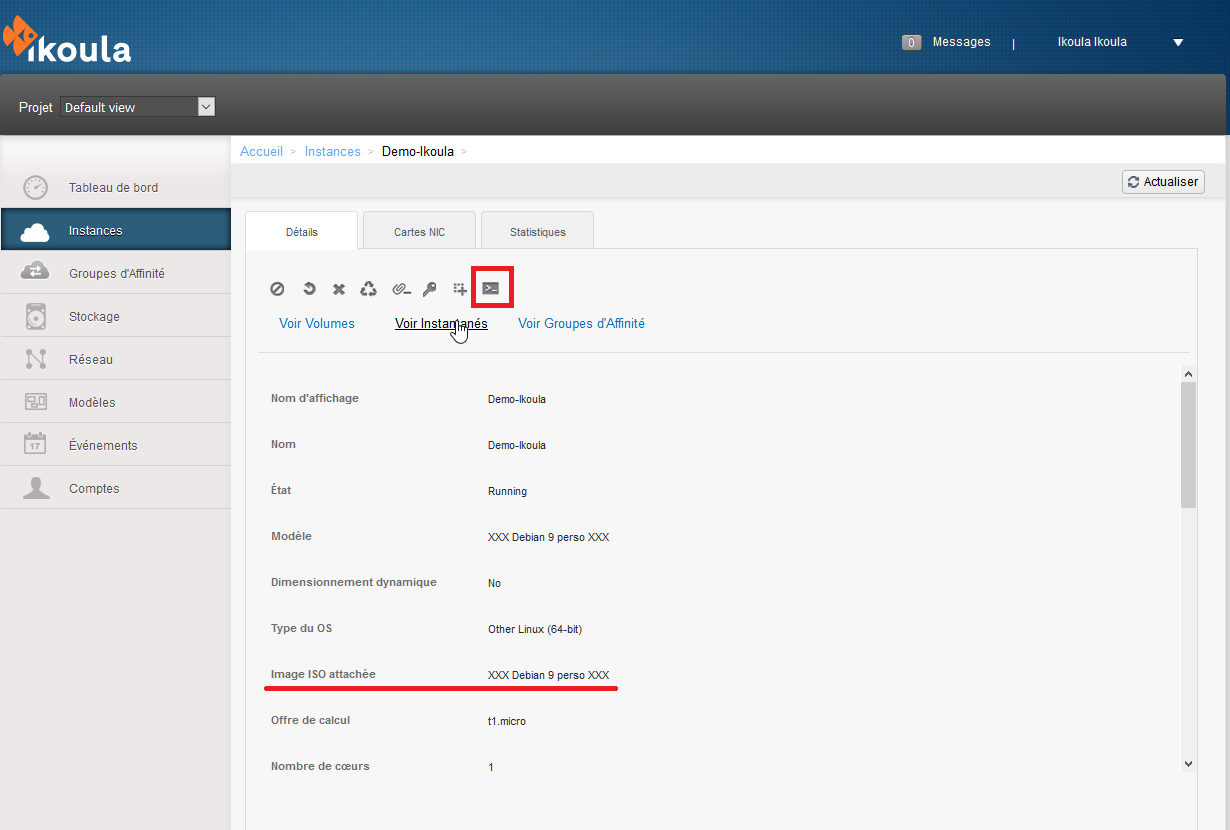
Une fois votre instance démarrer il vous faudra vous connecter à l'aide du KVM virtuel pour procéder à l'installation du système et à sa configuration minimale (réseau, mots de passe, etc).
- Pour vous connecter une fois avoir sélectionner votre instance cliquez sur l'icône en haut
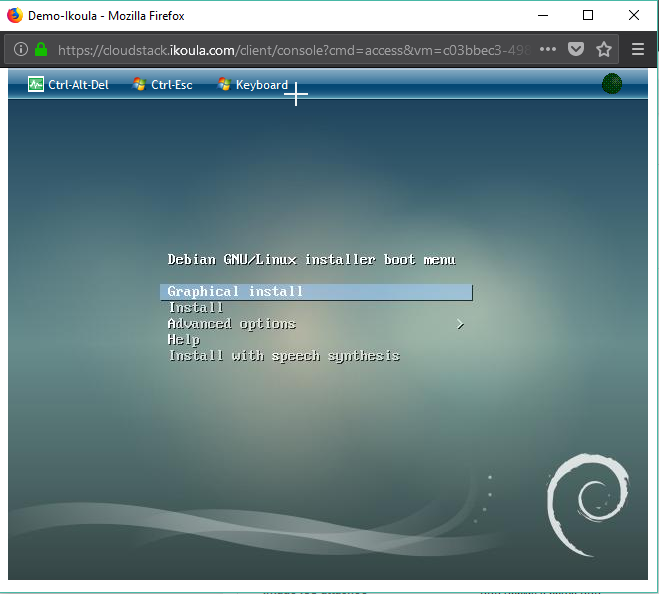
Vous devriez avoir accès à votre instance depuis une pop-up au travers de laquelle vous pourrez procéder à l'installation de votre système.
Cette fenêtre est en fait une console KVM vers votre instance, vous permettant ainsi de prendre la main dessus même si vous n'avez pas d'accès réseau à celle-ci.
Installation de votre base et personnalisation
Voici les quelques points importants durant l'installation de la base pour la création d'un modèle compatible Cloud Ikoula One :
1 - Réseau : lors de l'installation un bail DHCP est offert à l'instance, laisser la configuration automatique de votre réseau s’effectuer par l'installateur
2 - Partitionnement : Nous recommandons vivement l'utilisation de LVM pour permettre plus de flexibilité à votre modèle, vous trouverez ci-joint un plan de partitionnement en exemple.
	Table de partition du disque xvda en _GPT_
		- Partition de type _ext2_ de 1Go nommé boot avec comme point de montage /boot
		- Groupe de volume vg01 contenant :
			- Volume logique swap de 1Go
			- Volume logique root du restant de votre disque
		- Partition du type _swap_
		- Partition de type _ext4_ nommé root avec comme point de montage /
3 - Installer un serveur ssh et le configurer pour permettre la connexion
4 - Ouvrir et rediriger les ports nécessaires à la connexion ssh et à l'installation de paquets.
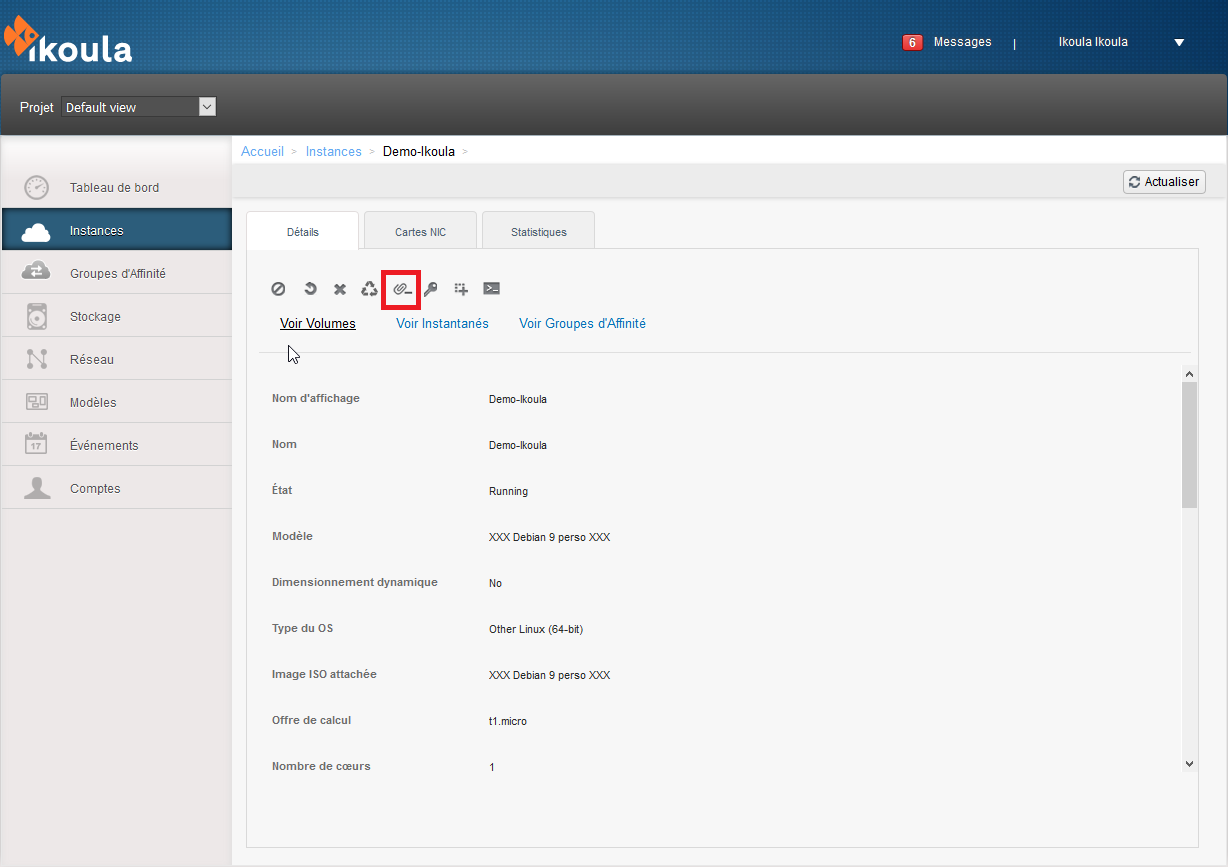
- Après installation du système de base détacher l'iso
- Connectez-vous à l'instance après un dernier redémarrage du système avec l'ISO détaché
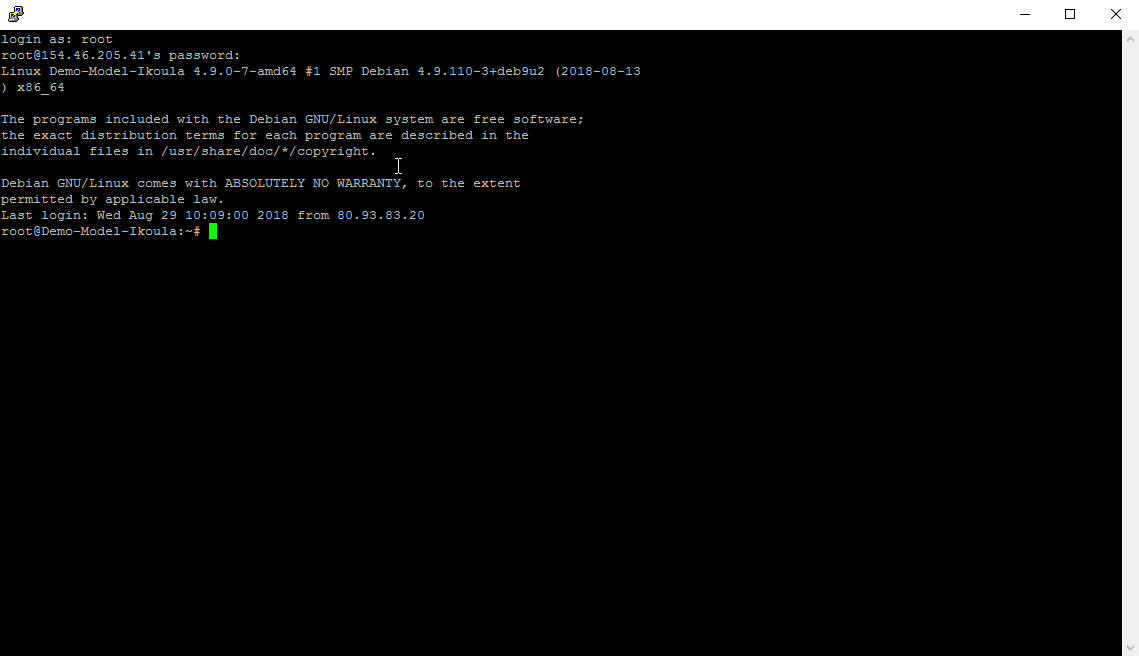
Ps : Dans notre exemple nous utliserons Putty https://putty.org/
Vous pouvez ainsi vérifier que tout soit en ordre au niveau du disque et des partitions :
root@Demo-Model-Ikoula:~# lsblk
NAME          MAJ:MIN RM  SIZE RO TYPE MOUNTPOINT
sr0            11:0    1 1024M  0 rom
xvda          202:0    0   15G  0 disk
├─xvda1       202:1    0  953M  0 part /boot
└─xvda2       202:2    0 14.1G  0 part
  ├─vg01-swap 254:0    0  952M  0 lvm  [SWAP]
  └─vg01-root 254:1    0 13.1G  0 lvm  /
root@Demo-Model-Ikoula:~# fdisk -l
Disk /dev/xvda: 15 GiB, 16106127360 bytes, 31457280 sectors
Units: sectors of 1 * 512 = 512 bytes
Sector size (logical/physical): 512 bytes / 512 bytes
I/O size (minimum/optimal): 512 bytes / 512 bytes
Disklabel type: gpt
Disk identifier: 4F115A5C-B4BC-4910-952A-52DA2BAF6F91

Device       Start      End  Sectors  Size Type
/dev/xvda1    2048  1953791  1951744  953M Linux filesystem
/dev/xvda2 1953792 31455231 29501440 14.1G Linux LVM


Disk /dev/mapper/vg01-swap: 952 MiB, 998244352 bytes, 1949696 sectors
Units: sectors of 1 * 512 = 512 bytes
Sector size (logical/physical): 512 bytes / 512 bytes
I/O size (minimum/optimal): 512 bytes / 512 bytes


Disk /dev/mapper/vg01-root: 13.1 GiB, 14105444352 bytes, 27549696 sectors
Units: sectors of 1 * 512 = 512 bytes
Sector size (logical/physical): 512 bytes / 512 bytes
I/O size (minimum/optimal): 512 bytes / 512 bytes
root@Demo-Model-Ikoula:~# pvs
  PV         VG   Fmt  Attr PSize  PFree
  /dev/xvda2 vg01 lvm2 a--  14.07g    0
root@Demo-Model-Ikoula:~# vgs
  VG   #PV #LV #SN Attr   VSize  VFree
  vg01   1   2   0 wz--n- 14.07g
root@Demo-Model-Ikoula:~# lvs
  LV   VG   Attr       LSize   Pool Origin Data%  Meta%  Move Log Cpy%Sync Convert
  root vg01 -wi-ao----  13.14g
  swap vg01 -wi-ao---- 952.00m
- Configuration des locales
Afin de pouvoir faire fonctionner certains scripts dont celui pour le redimensionnement nous devons basculer les loacles systèmes en anglais pour éviter ainsi une traduction des unités de tailles des systèmes de fichiers et partitions par l'utilitaire gdisk.
localectl set-locale en_US.utf8
PS : ne changez rien d'autre, si vous avez configuré votre système pour utiliser un clavier français vous resterez bien en _AZERTY_
- Installation des paquets cloud-init
root@Demo-Model-Ikoula:~# apt install cloud-init cloud-guest-utils parted gdisk
Reading package lists... Done
Building dependency tree
Reading state information... Done
parted is already the newest version (3.2-17).
The following additional packages will be installed:
  libyaml-0-2 python3-blinker python3-configobj python3-jinja2 python3-json-pointer python3-jsonpatch python3-jwt python3-markupsafe python3-oauthlib python3-prettytable python3-yaml
Suggested packages:
  python-blinker-doc python-configobj-doc python-jinja2-doc python3-crypto
The following NEW packages will be installed:
  cloud-guest-utils cloud-init gdisk libyaml-0-2 python3-blinker python3-configobj python3-jinja2 python3-json-pointer python3-jsonpatch python3-jwt python3-markupsafe python3-oauthlib python3-prettytable
  python3-yaml
0 upgraded, 14 newly installed, 0 to remove and 0 not upgraded.
Need to get 997 kB of archives.
After this operation, 4,660 kB of additional disk space will be used.
Do you want to continue? [Y/n]
- Le paquet cloud-init vous permettra d'utiliser les scripts gérant la mise à jour du hostname de l'instance, du mots de passe root de celle-ci ainsi que de l'injection de potentiel clé ssh présente sur votre compte Cloud Ikoula One.
- Le paquet cloud-guest-utils permet quant à lui d'utiliser un quatrième script autorisant le redimensionnement au démarrage du partitionnement et du système de fichier de l'instance.
- Le paquet gdisk est utilisé par le paquet cloud-guest-utils durant l’agrandissement du système de fichier et de partition.
- Le paquet parted quand à lui permettra de facilement avoir accès à la table de partition au format GPT.
PS : pour les distribution de basé sur les RPM comme CentOS le paquet cloud-guest-utils est remplacé par le paquet cloud-growpart.
- Configuration de la partie cloud-init
Après installation des paquets nécessaires nous allons procéder à la configuration et l'optimisation de celle-ci.
6 - Configuration et optimisation du fichier de configuration principale, le fichier est placé dans /etc/cloud/coud.cfg
# The top level settings are used as module
# and system configuration.

# A set of users which may be applied and/or used by various modules
# when a 'default' entry is found it will reference the 'default_user'
# from the distro configuration specified below
users:
   - default

# If this is set, 'root' will not be able to ssh in and they
# will get a message to login instead as the above $user (ubuntu)
disable_root: false

# This will cause the set+update hostname module to not operate (if true)
preserve_hostname: false

# Example datasource config
# datasource:
#    Ec2:
#      metadata_urls: [ 'blah.com' ]
#      timeout: 5 # (defaults to 50 seconds)
#      max_wait: 10 # (defaults to 120 seconds)

# The modules that run in the 'init' stage
cloud_init_modules:
 - migrator
 - bootcmd
 - write-files
 - resizefs
 - set_hostname
 - update_hostname
 - update_etc_hosts
 - ca-certs
 - rsyslog
 - users-groups
 - ssh

# The modules that run in the 'config' stage
cloud_config_modules:
# Emit the cloud config ready event
# this can be used by upstart jobs for 'start on cloud-config'.
 - emit_upstart
 - mounts
 - ssh-import-id
 - locale
 - set-passwords
 - grub-dpkg
 - apt-pipelining
 - apt-configure
 - package-update-upgrade-install
 - landscape
 - timezone
 - puppet
 - chef
 - salt-minion
 - mcollective
 - disable-ec2-metadata
 - runcmd
 - byobu

# The modules that run in the 'final' stage
cloud_final_modules:
 - rightscale_userdata
 - scripts-per-once
 - scripts-per-boot
 - scripts-per-instance
 - scripts-user
 - ssh-authkey-fingerprints
 - keys-to-console
 - phone-home
 - final-message
 - power-state-change

# System and/or distro specific settings
# (not accessible to handlers/transforms)
system_info:
   # This will affect which distro class gets used
   distro: debian
   default_user:
     name: root

   # Other config here will be given to the distro class and/or path classes
   paths:
      cloud_dir: /var/lib/cloud/
      templates_dir: /etc/cloud/templates/
   package_mirrors:
     - arches: [amd64]
       failsafe:
         primary: http://mirror.debian.ikoula.com/debian/
7 - Configuration et optimisation du logging, le fichier est placé dans /etc/cloud/cloud.cfg.d/05_logging.cfg
Vous pouvez si vous le désirez limité la façon dont Cloud Init log les évenements sur votre instance en modifiant au besoin le niveau de LOG qui est fixé à DEBUG.
Cette FAQ vous explique ce que vous pouvez utilisez, nous recommandons l'utilisation 'da minima le niveau Warning permettant de détecter les erreurs mais ne vous poulluant pas de log si tout va bien.
Documentation Logging Python https://docs.python.org/3/library/logging.config.html#configuration-file-format
## This yaml formated config file handles setting
## logger information.  The values that are necessary to be set
## are seen at the bottom.  The top '_log' are only used to remove
## redundency in a syslog and fallback-to-file case.
##
## The 'log_cfgs' entry defines a list of logger configs
## Each entry in the list is tried, and the first one that
## works is used.  If a log_cfg list entry is an array, it will
## be joined with '\n'.
_log:
 - &log_base |
   [loggers]
   keys=root,cloudinit

   [handlers]
   keys=consoleHandler,cloudLogHandler

   [formatters]
   keys=simpleFormatter,arg0Formatter

   [logger_root]
   level=DEBUG
   handlers=consoleHandler,cloudLogHandler

   [logger_cloudinit]
   level=DEBUG
   qualname=cloudinit
   handlers=
   propagate=1

   [handler_consoleHandler]
   class=StreamHandler
   level=WARNING
   formatter=arg0Formatter
   args=(sys.stderr,)

   [formatter_arg0Formatter]
   format=%(asctime)s - %(filename)s[%(levelname)s]: %(message)s

   [formatter_simpleFormatter]
   format=[CLOUDINIT] %(filename)s[%(levelname)s]: %(message)s
 - &log_file |
   [handler_cloudLogHandler]
   class=FileHandler
   level=DEBUG
   formatter=arg0Formatter
   args=('/var/log/cloud-init.log',)
 - &log_syslog |
   [handler_cloudLogHandler]
   class=handlers.SysLogHandler
   level=DEBUG
   formatter=simpleFormatter
   args=("/dev/log", handlers.SysLogHandler.LOG_USER)

log_cfgs:
# Array entries in this list will be joined into a string
# that defines the configuration.
#
# If you want logs to go to syslog, uncomment the following line.
# - [ *log_base, *log_syslog ]
#
# The default behavior is to just log to a file.
# This mechanism that does not depend on a system service to operate.
 - [ *log_base, *log_file ]
# A file path can also be used.
# - /etc/log.conf

# This tells cloud-init to redirect its stdout and stderr to
# 'tee -a /var/log/cloud-init-output.log' so the user can see output
# there without needing to look on the console.
output: {all: '| tee -a /var/log/cloud-init-output.log'}
8 - Configuration et optimisation pour le Cloud Ikoula One, le fichier est placé dans /etc/cloud/coud.cfg.d/99_cloudstack.cfg
datasource:
  CloudStack: {}
  None: {}
datasource_list:
  - CloudStack
9 - Mise en place des scripts cloud-init propre à Ikoula
Vous pouvez récupérer le nécessaire à cet url : http://mirror.ikoula.com/pub/cio/
wget -nv -r -nH --cut-dirs=2 ftp://mirror.ikoula.com/pub/cio/cloud/ -P /var/lib/
10 - Rendre exécutable les scripts :
chmod +x /var/lib/lib/cloud/scripts/per-boot/* /var/lib/lib/scripts/per-once/*
11 - Nettoyage de votre système et fin de la personalisation
A partir de cette étape vous êtres libre d'installer et configurer au besoin d'autre paquets.
Vous pouvez nettoyer tous les fichiers de caches et de log afin de rendre vierge le système pour l'étape de création de modèle.
PS : Nous vous recommandons de procédez avant nettoyage à une confirmation d'un mot de passe générique vous permettant si pour une raison inconu ou un oubli lors du'une étape de configuration que le mot de passe/et ou la clé SSH normalement fourni par Cloud Ikoula One ne soit pas valide vous ne parviendrez pas à vous connecter à l'instance.
Création du modèle
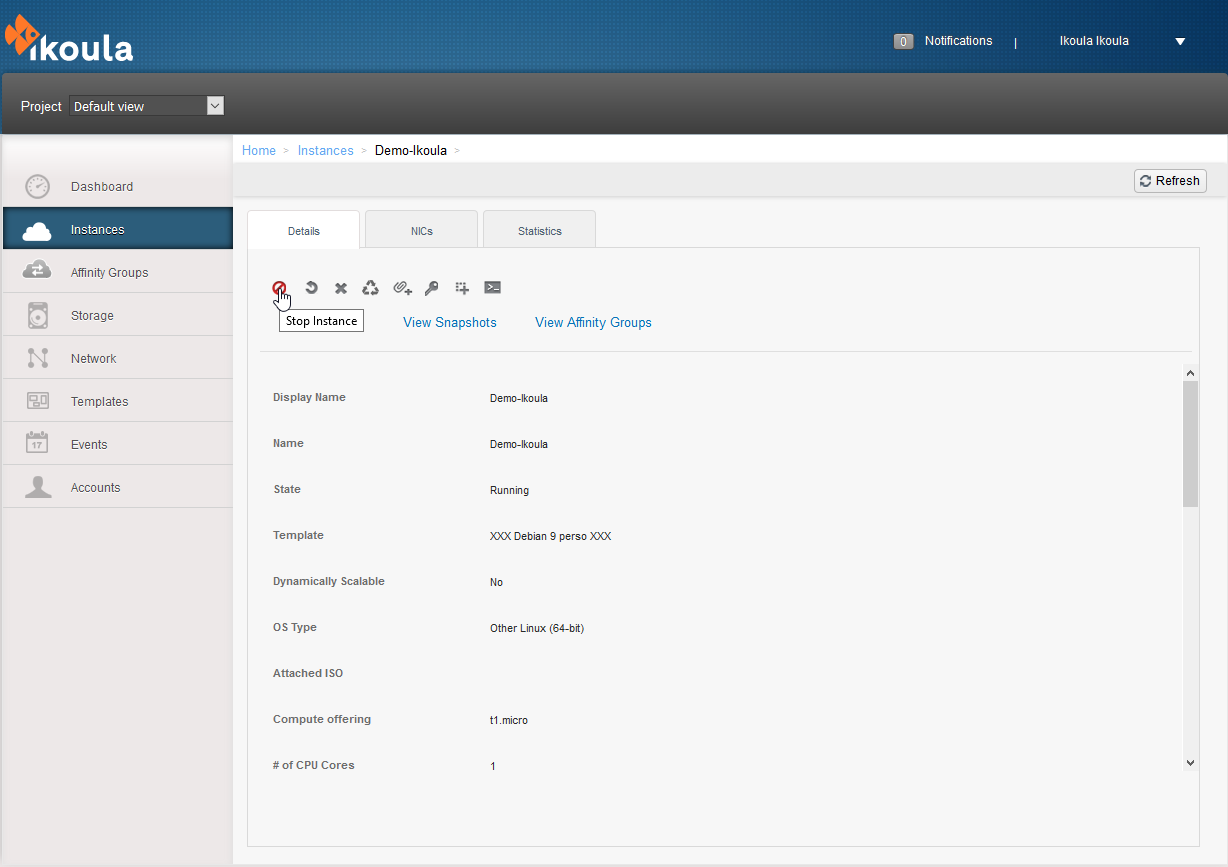
Maintenant que notre système de base est prêt nous pouvons procédez à l'extinction de l'instance et Créer un modèle à partir de mon Instance
Une fois enregistré dans la zone de déploiement de votre instance référence votre template est visible dans la partie Modèles de votre interface de gestion Cloud Ikoula One
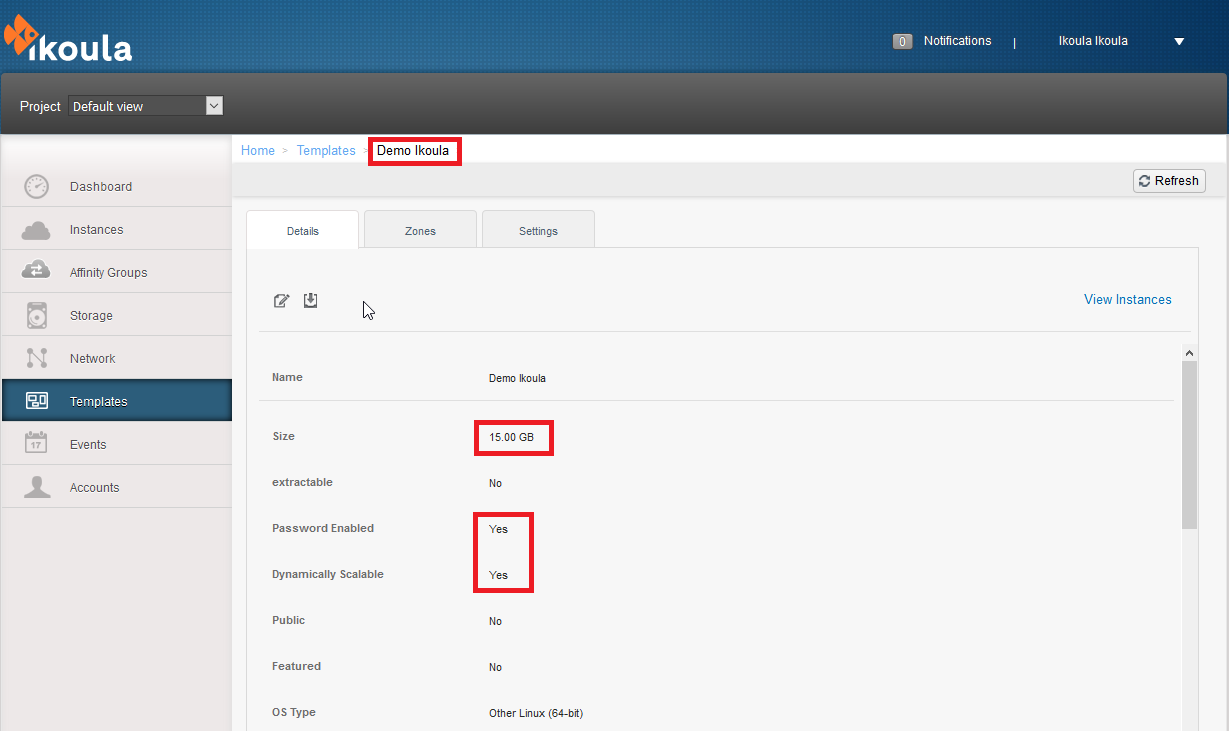
Vous pouvez vérifier la taille et les capacités dynamique et de personnalisation du mots de passe via l'orchestrateur directement depuis la page de votre template
Conclusion
Vous pourrez ainsi dorénavant créer vos propres modèles selon vos besoins et bénéficier d'une complète compatibilité avec le Cloud Ikoula One.
Cet article vous a semblé utile ?





Activer l'actualisation automatique des commentaires